Contents
- Why AI Faces Drift by Default
- Step 1: Define Her Core Essence First
- Step 2: Choosing Features with Visual Comparison Grids
- The Baseline Reference Photo
- Face Shapes
- Eyebrows
- Eyes
- Nose
- Lips
- Skin Complexion & Texture
- The Anchor Mark: Give Her a Distinct Feature
- Five Ready-to-Use Archetypes
- Step 3: Write the Character Card
- Step 4: Shoot the Master Reference Image
- Step 5: Roll Multiple Candidates & Curate
- Step 6: Supplementary Multi-Angle Reference Sheet
- Step 7: Everyday Production Workflow
- Troubleshooting Facial Inconsistency
- Final Advice
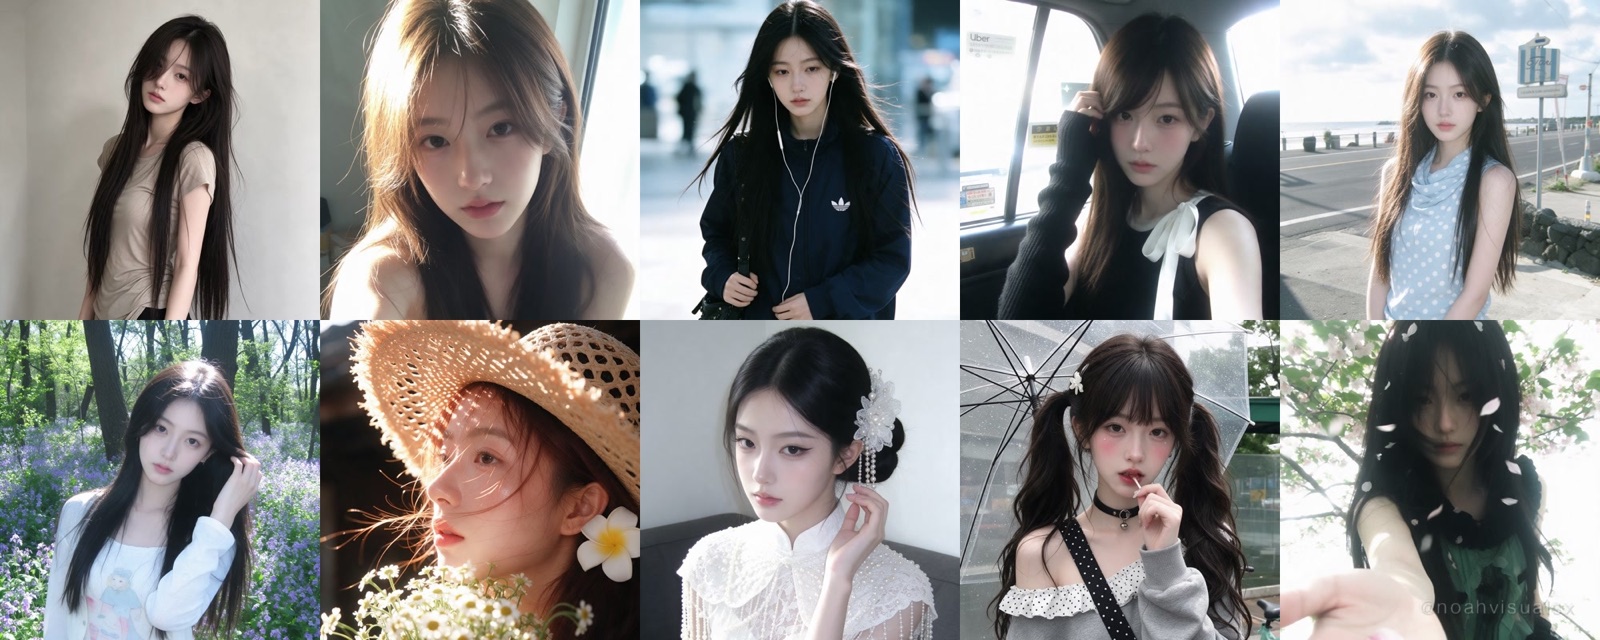
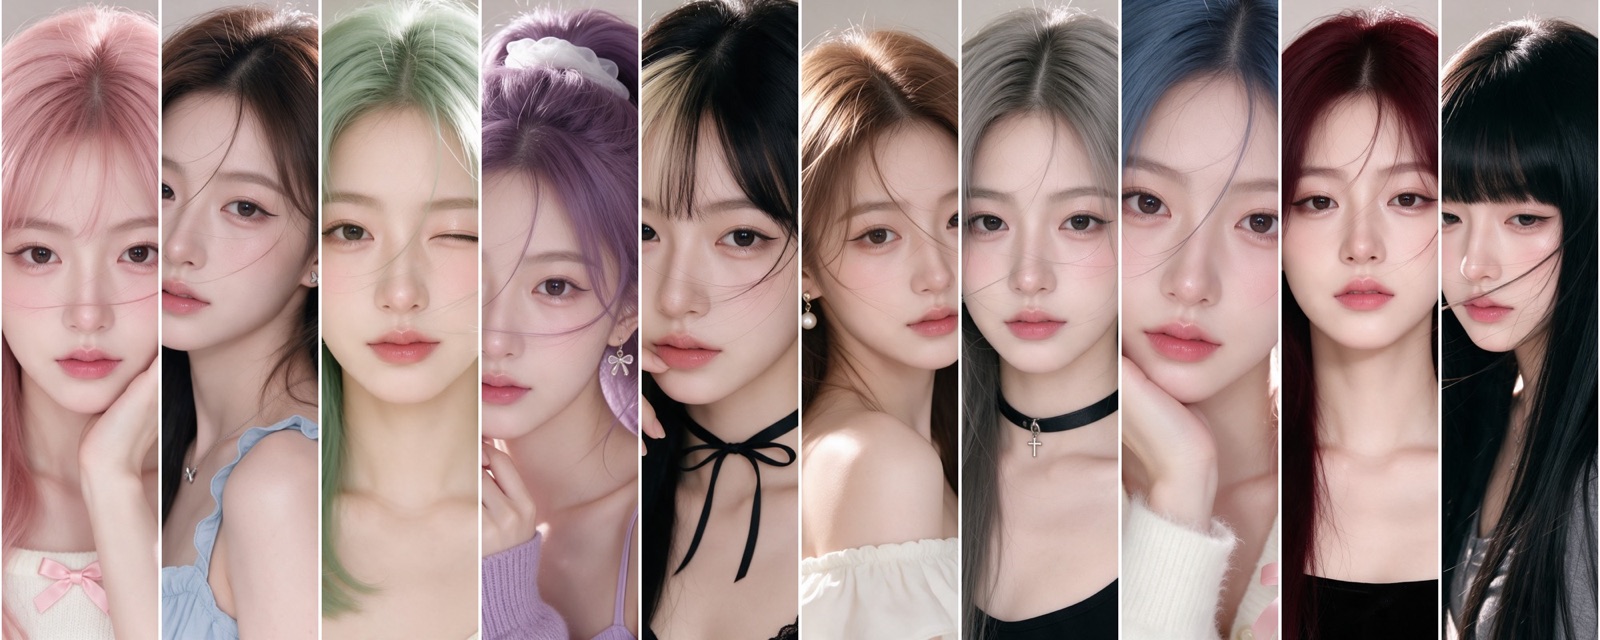
Anyone who generates AI portraits for long enough hits this exact wall: you run the exact same prompt five times, and every roll produces a completely new person. Today she looks cool and aloof, tomorrow she’s a cheerful sweetheart, and four outputs in a batch look like four total strangers.
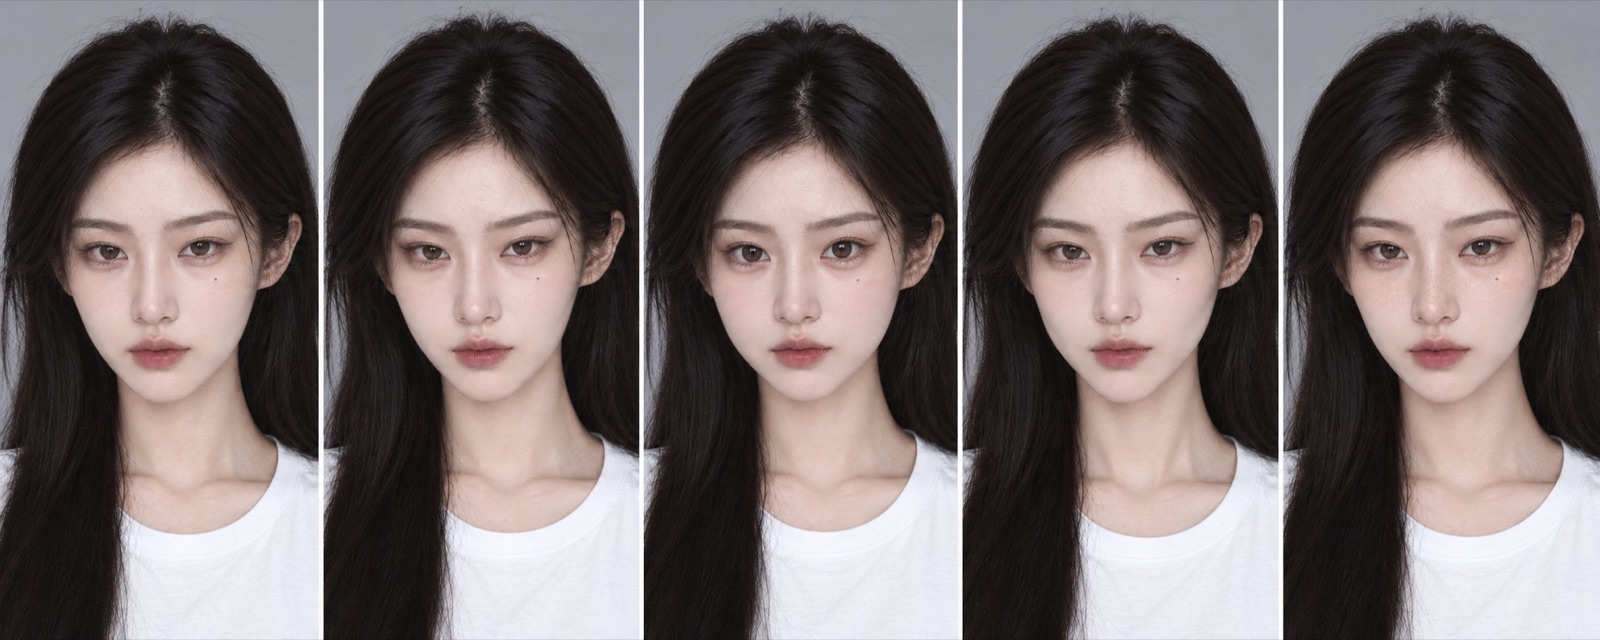
I struggled with this for weeks. The solution was designing my own fixed virtual character and anchoring every subsequent generation to her master reference image.
This guide documents my complete facial crafting workflow. I took a single base face and generated side-by-side comparison grids isolating every single variable—face shape, brows, eyes, nose, lips, and skin texture. You can pick and choose by looking at the images directly, which is infinitely more intuitive than guessing from text descriptions.
Why AI Faces Drift by Default
Think about common prompt descriptors: cool porcelain skin, petite head, fox eyes, high nose bridge. How many billions of potential faces fit that description? The model simply rolls a statistical die and draws a random match from latent space. No matter how many adjectives you stack, without a concrete visual anchor, the model is always guessing.
My approach breaks down into two phases:
- The Character Card: Write a hyper-specific textual profile describing the immutable features of the face.
- The Master Passport Image: Generate a clean, flat-lit baseline portrait from that card, and pass it into image-to-image conditioning for every future shoot. That is how you lock a face.
Here is the exact step-by-step process.
Step 1: Define Her Core Essence First
Before touching individual facial features, anchor her identity in a single sentence: age, core aura, and typical photographic style.
My primary character is: an adult woman around 22 years old, quiet and contemplative with an aloof edge, photographed primarily in vintage 35mm film and forest dreamcore aesthetics.
Having this core identity settled gives you clear directional guidance for choosing facial features. A cool, aloof character calls for slender, elongated features. A bubbly aesthetic calls for rounded eyes and shorter face proportions. An edgy street style needs sharp brow arches and a crisp jawline. If your direction is muddy, individual features might look fine on their own, but when assembled together the face feels mismatched.
Tip: Always specify an adult age (e.g., ~22 years old). Prompts requesting teenage years often trigger models to draw unnaturally babyish proportions that look jarring when styled in mature outfits later.
Step 2: Choosing Features with Visual Comparison Grids
This step takes the most time, but yields the biggest payoff. Generic adjectives like “gorgeous” or “exquisite” are ignored by diffusion models. You need to decompose the face into concrete anatomical choices.
Every comparison grid below was generated using the exact same baseline face. Hair, lighting, expression, angle, and framing were kept strictly identical, changing only one feature at a time so you can see precisely what each keyword does.
The Baseline Reference Photo
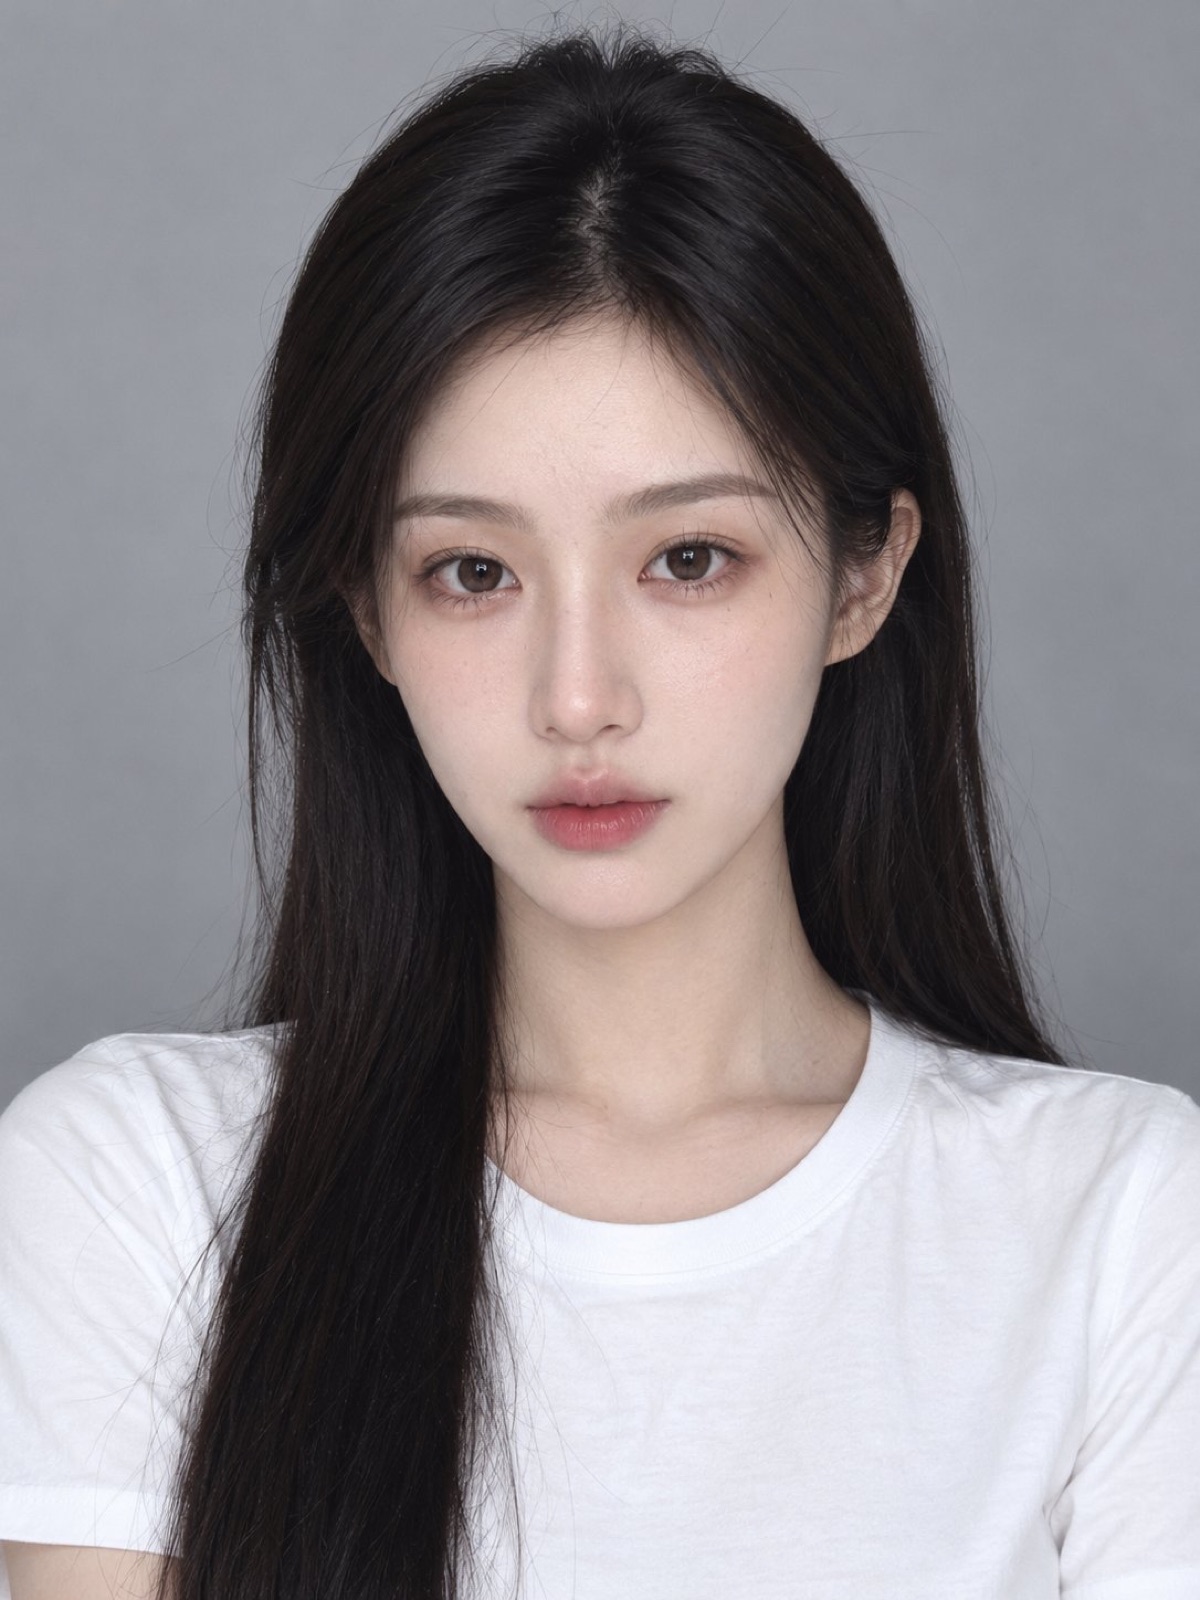
Generate this initial neutral portrait first (all subsequent comparison grids upload this image as their reference):
【Base Image Prompt: Generate this baseline first, and upload it as reference for all steps 2-10】A 22-year-old young adult woman, balanced oval face, symmetrical classic facial features, natural straight eyebrows, almond eyes with subtle hooded eyelids, moderate nose bridge height, natural lip contour, natural Asian skin tone, long straight black hair tucked behind ears exposing forehead and both ears, completely barefaced without makeup, simple plain white crew-neck t-shirt, solid light-grey studio background, front-facing eye-level camera angle, bust portrait from chest up, soft even frontal studio lighting, no harsh facial shadows, clear unobstructed facial features, calm relaxed neutral expression, lips gently closed, realistic photography, ultra-high definition, natural skin texture preserved, 3:4 aspect ratio
Face Shapes
I always choose the face shape first, because it dictates the entire character silhouette.
- Classic Oval: The safest, most versatile shape. Works across any styling or lighting.
- Narrow Elongated Oval: More mature, calm, and aloof. This is what I use for my main character.
- Tapered Heart: Slender cheeks with a pointed chin. Very modern and photogenic for smartphone selfies.
- Petite Round: Shorter vertical proportions with soft cheeks. Youthful and cute, though can look young in formal styling.
- Soft Square: Slightly broader jaw angle with softened contours. Looks grounded and realistic, perfect for candid street photography.
- Diamond/Heart: Broader forehead tapering into a delicate chin. Doll-like with pronounced eye emphasis.
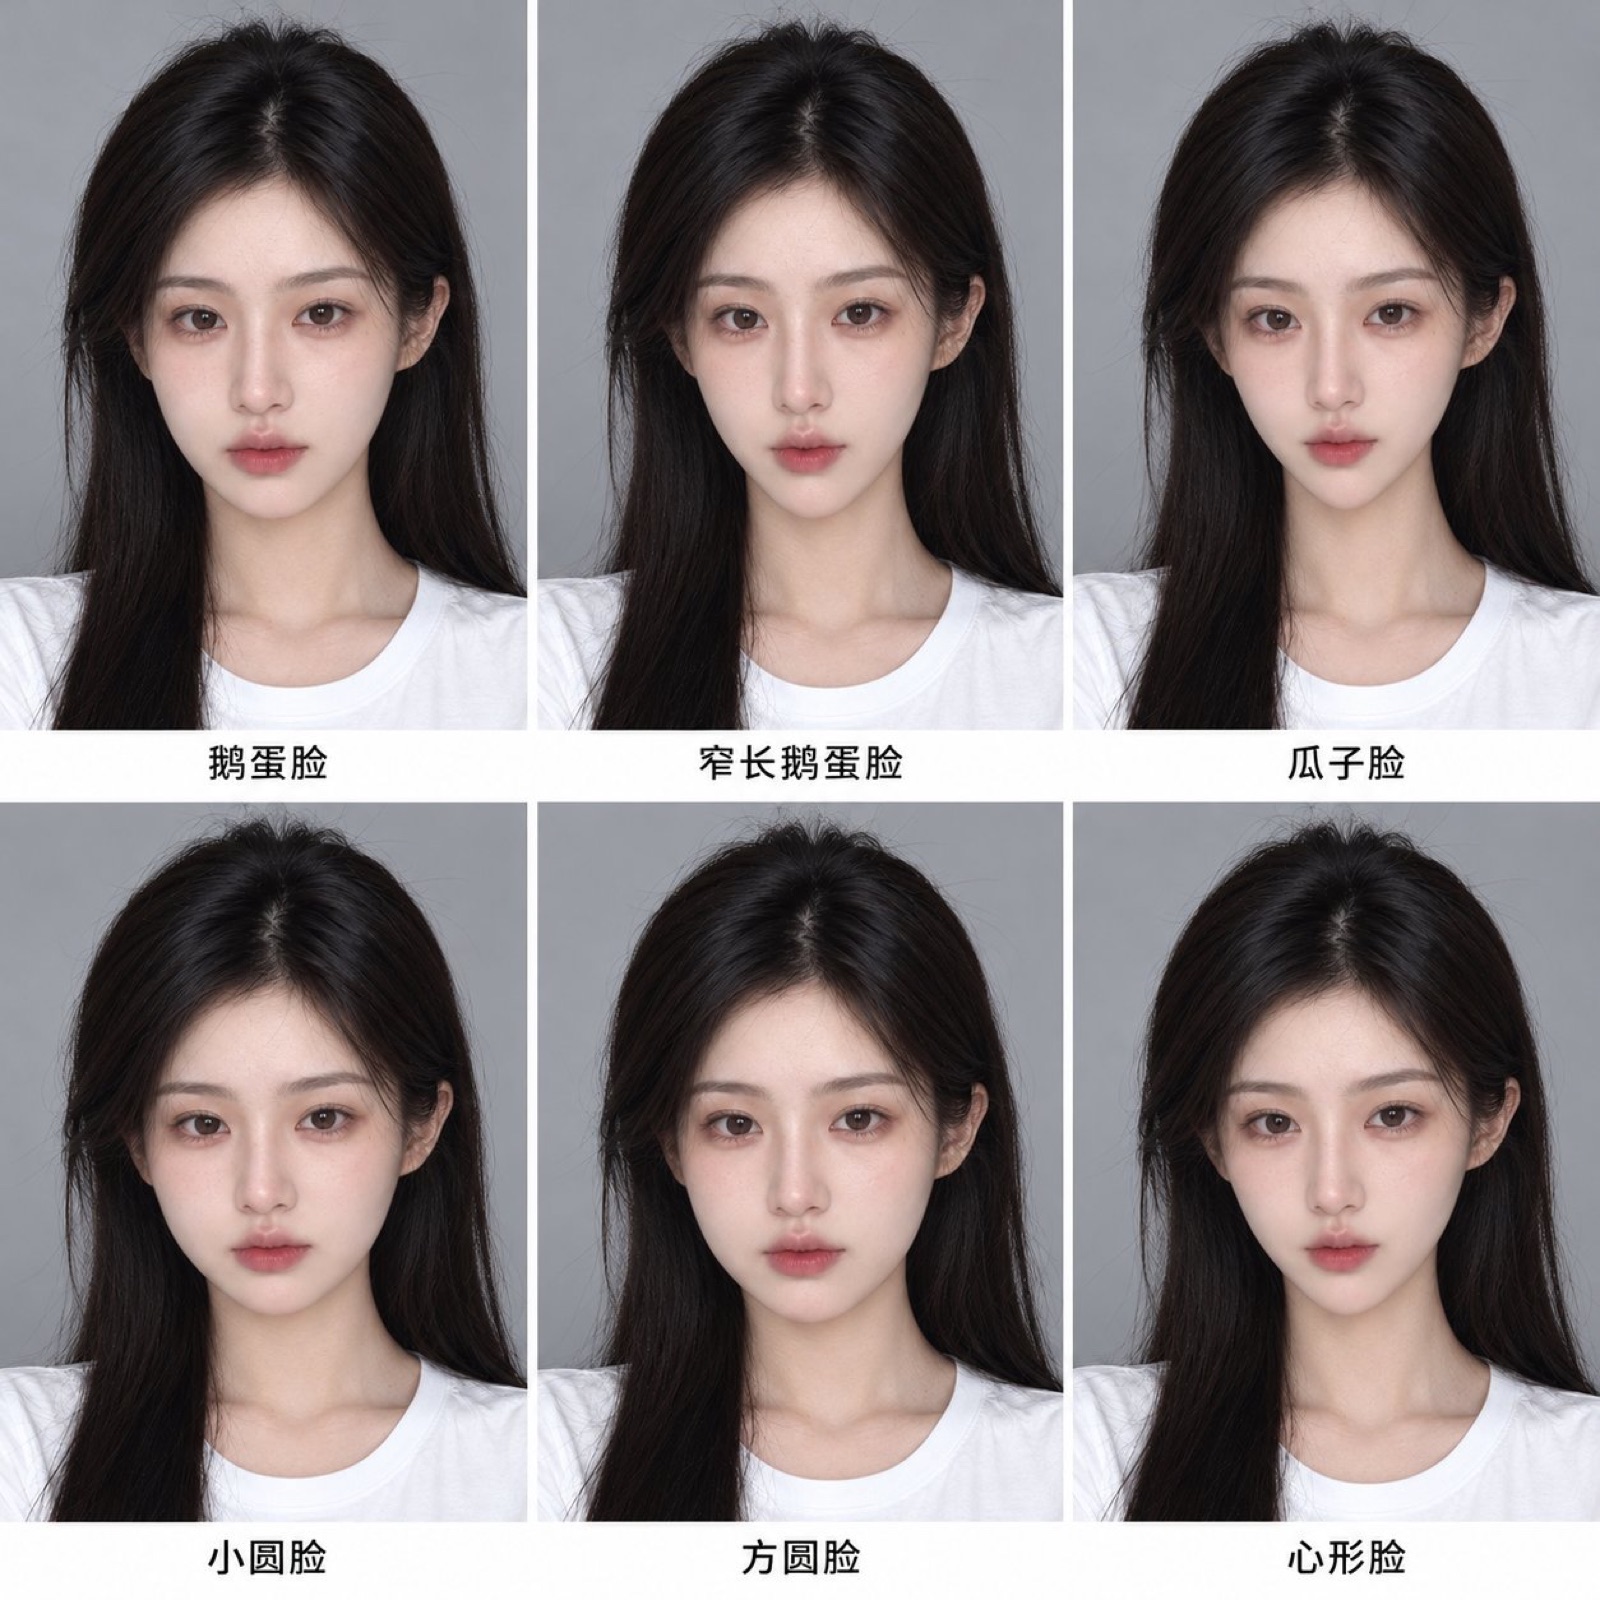
【Prompt, Upload Base Image】A 3-column by 2-row 6-panel side-by-side comparison grid, all 6 panels featuring the identical female subject from the reference image, identical hair, white t-shirt, light-grey background, frontal lighting, expression, camera angle, and framing; eyebrows, eyes, nose, and lips remain strictly identical to the reference image, with each panel altering only the face shape. From left to right, top to bottom: Panel 1: Classic oval face with balanced proportions and rounded chin; Panel 2: Narrow elongated oval face with tapered chin and defined jawline; Panel 3: Heart-shaped face with tapered cheeks and pointed chin; Panel 4: Petite round face with shorter proportions and fuller cheeks; Panel 5: Soft square face with slightly wider jaw angle and gentle contours; Panel 6: Diamond-heart face with wider forehead and delicate chin. Each panel neatly captioned underneath in small clean black text with its face shape name. Thin white borders separating panels, realistic studio photography, ultra-high definition, natural skin texture preserved, 1:1 aspect ratio
Eyebrows
Eyebrows are routinely overlooked in prompts, yet changing brow geometry completely transforms character personality:
- Straight Brows: Soft, gentle, innocent. The cornerstone of Korean natural makeup.
- Willow-Leaf Brows: Slender, elongated, softly curving down at the tail. Perfect for vintage, period, or Neo-Chinese aesthetics.
- Feathered Boy-Brows: Strong visible hair strokes and fluffy texture. Gives an effortless “no-makeup makeup” look ideal for casual snapshots.
- High-Arched Brows: Defined arch and lifted tail. Adds confidence, sharpness, and edge.
- Crescent Brows: Smooth feminine arc with gentle softness.
- Short Straight Brows: Youthful and slightly boyish; pairs great with short hair.
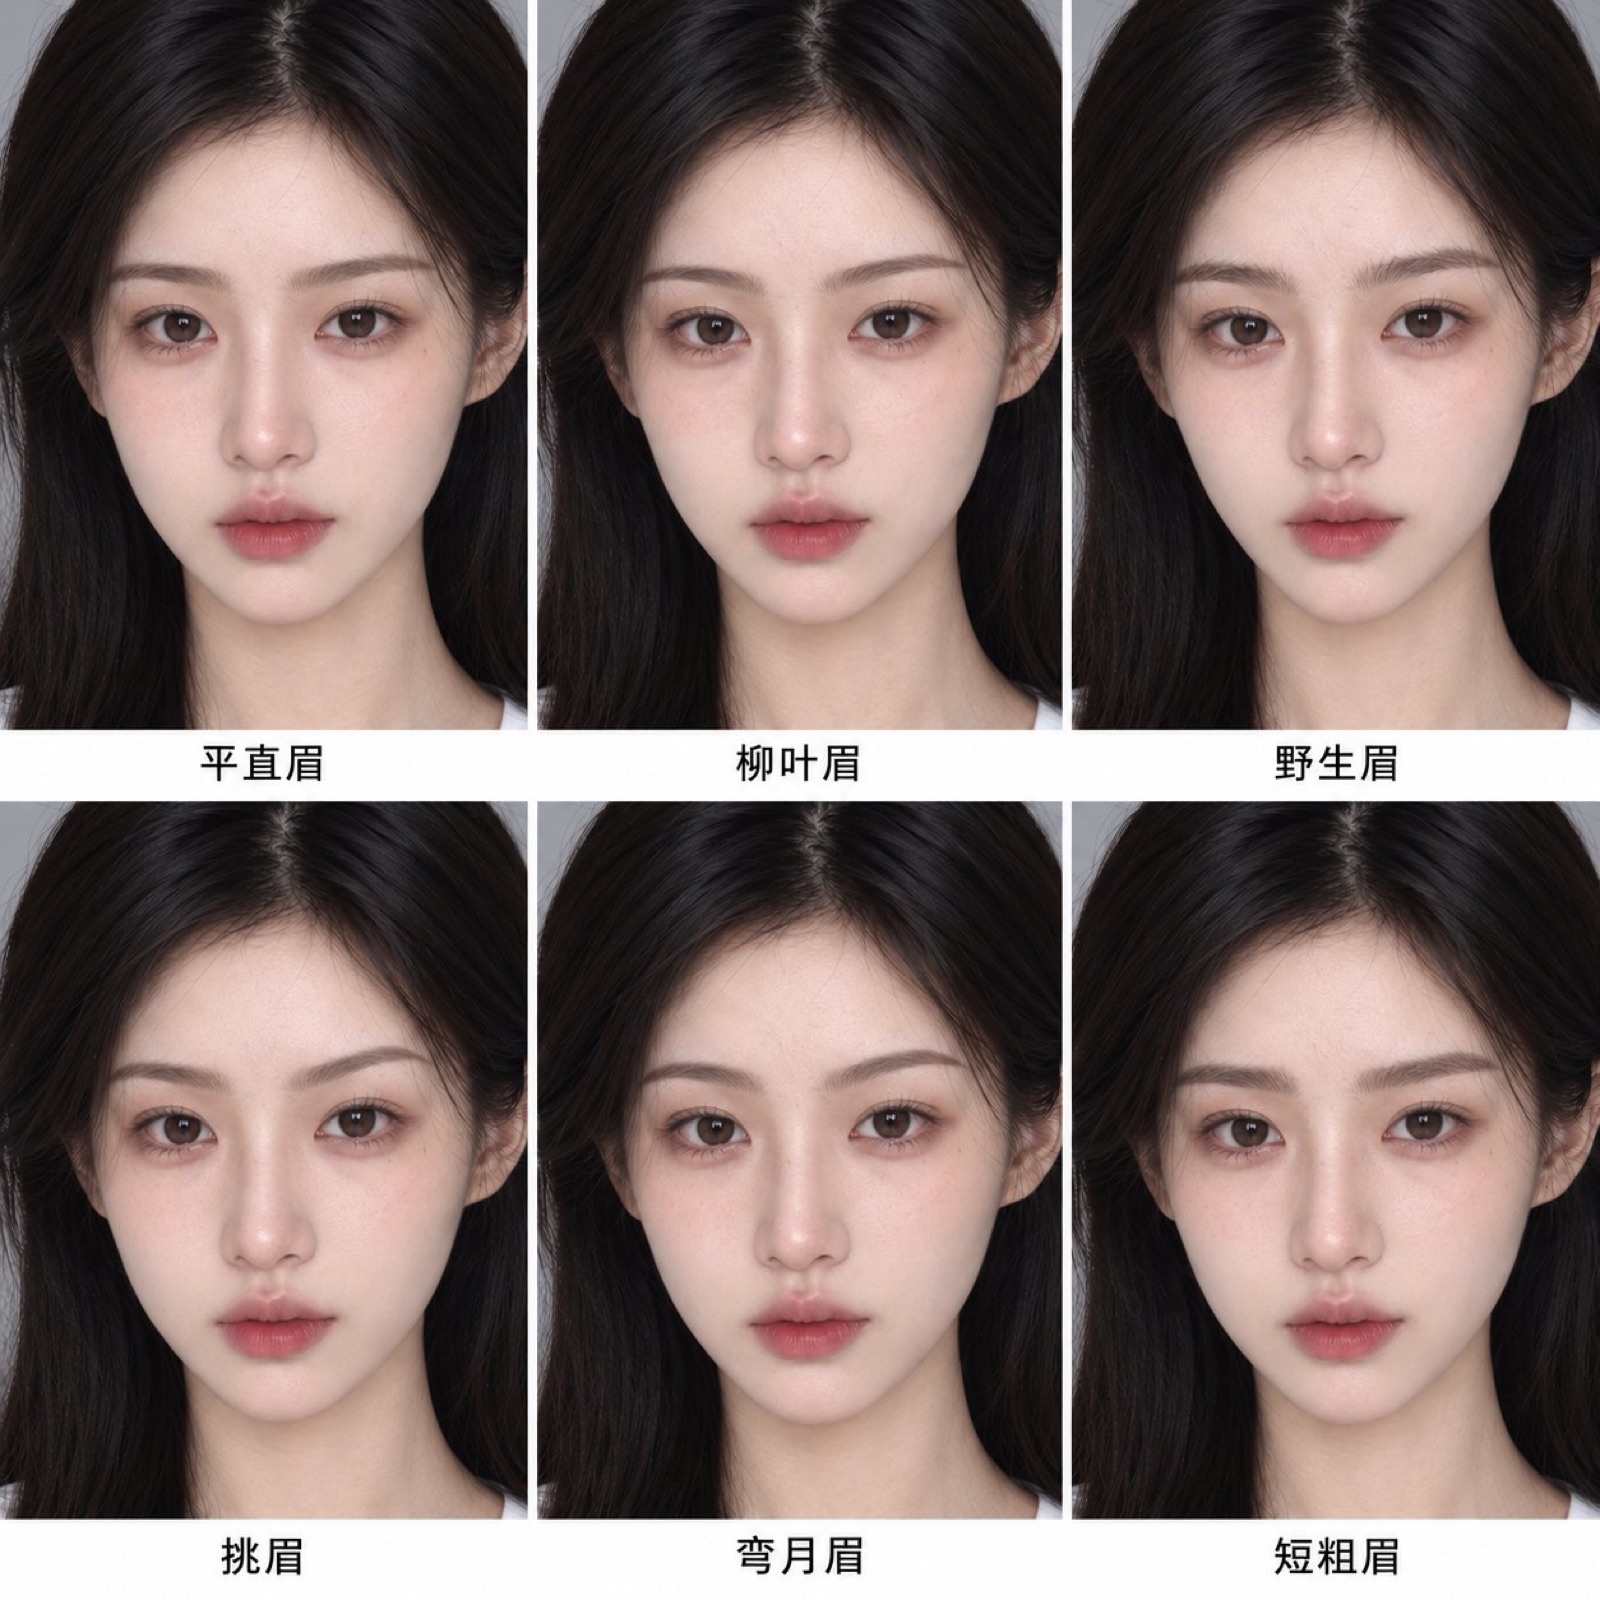
【Prompt, Upload Base Image】A 3-column by 2-row 6-panel comparison grid, all 6 panels featuring close-up frontal facial portraits of the identical female subject from the reference image, cropped from forehead to chin, with identical face shape, eyes, nose, lips, skin tone, hair, background, lighting, and expression; each panel modifies only the eyebrow shape, with eyebrow color uniformly dark brown. From left to right, top to bottom: Panel 1: Straight soft eyebrows with gentle gradient and no arch; Panel 2: Slender willow-leaf eyebrows with subtle downward taper at tails; Panel 3: Natural feathered boy-brows with visible individual hair strokes and fluffy texture; Panel 4: High-arched structured eyebrows with distinct arch and lifted tail; Panel 5: Crescent curved eyebrows with smooth soft arc; Panel 6: Short thick straight brows with youthful density. Small clean black text caption under each panel labeling eyebrow style. Thin white borders between panels, realistic photography, ultra-high definition, crisp eyebrow detail, 1:1 aspect ratio
Eyes
The eyes are the soul of character recognition. I specify three distinct attributes: eye shape, eyelid fold, and outer corner angle.
- Almond Eyes: Balanced, classic, clean. The most reliable shape across models.
- Feline Fox Eyes: Sharp inner canthus, elongated lifted outer corners. Cool, alluring, and distinctive.
- Round Eyes: Large and expressive. Great paired with rounder faces for sweet aesthetics.
- Droopy Puppy Eyes: Outer corners angle gently downward. Vulnerable, gentle, and endearing.
- Peach Blossom Eyes: Subtle upturn with a faint warm blush at the outer corners. Dreamy and romantic.
- Slender Phoenix Eyes: Elongated upward sweep with narrow crease. Distinctive East Asian high-fashion appeal.
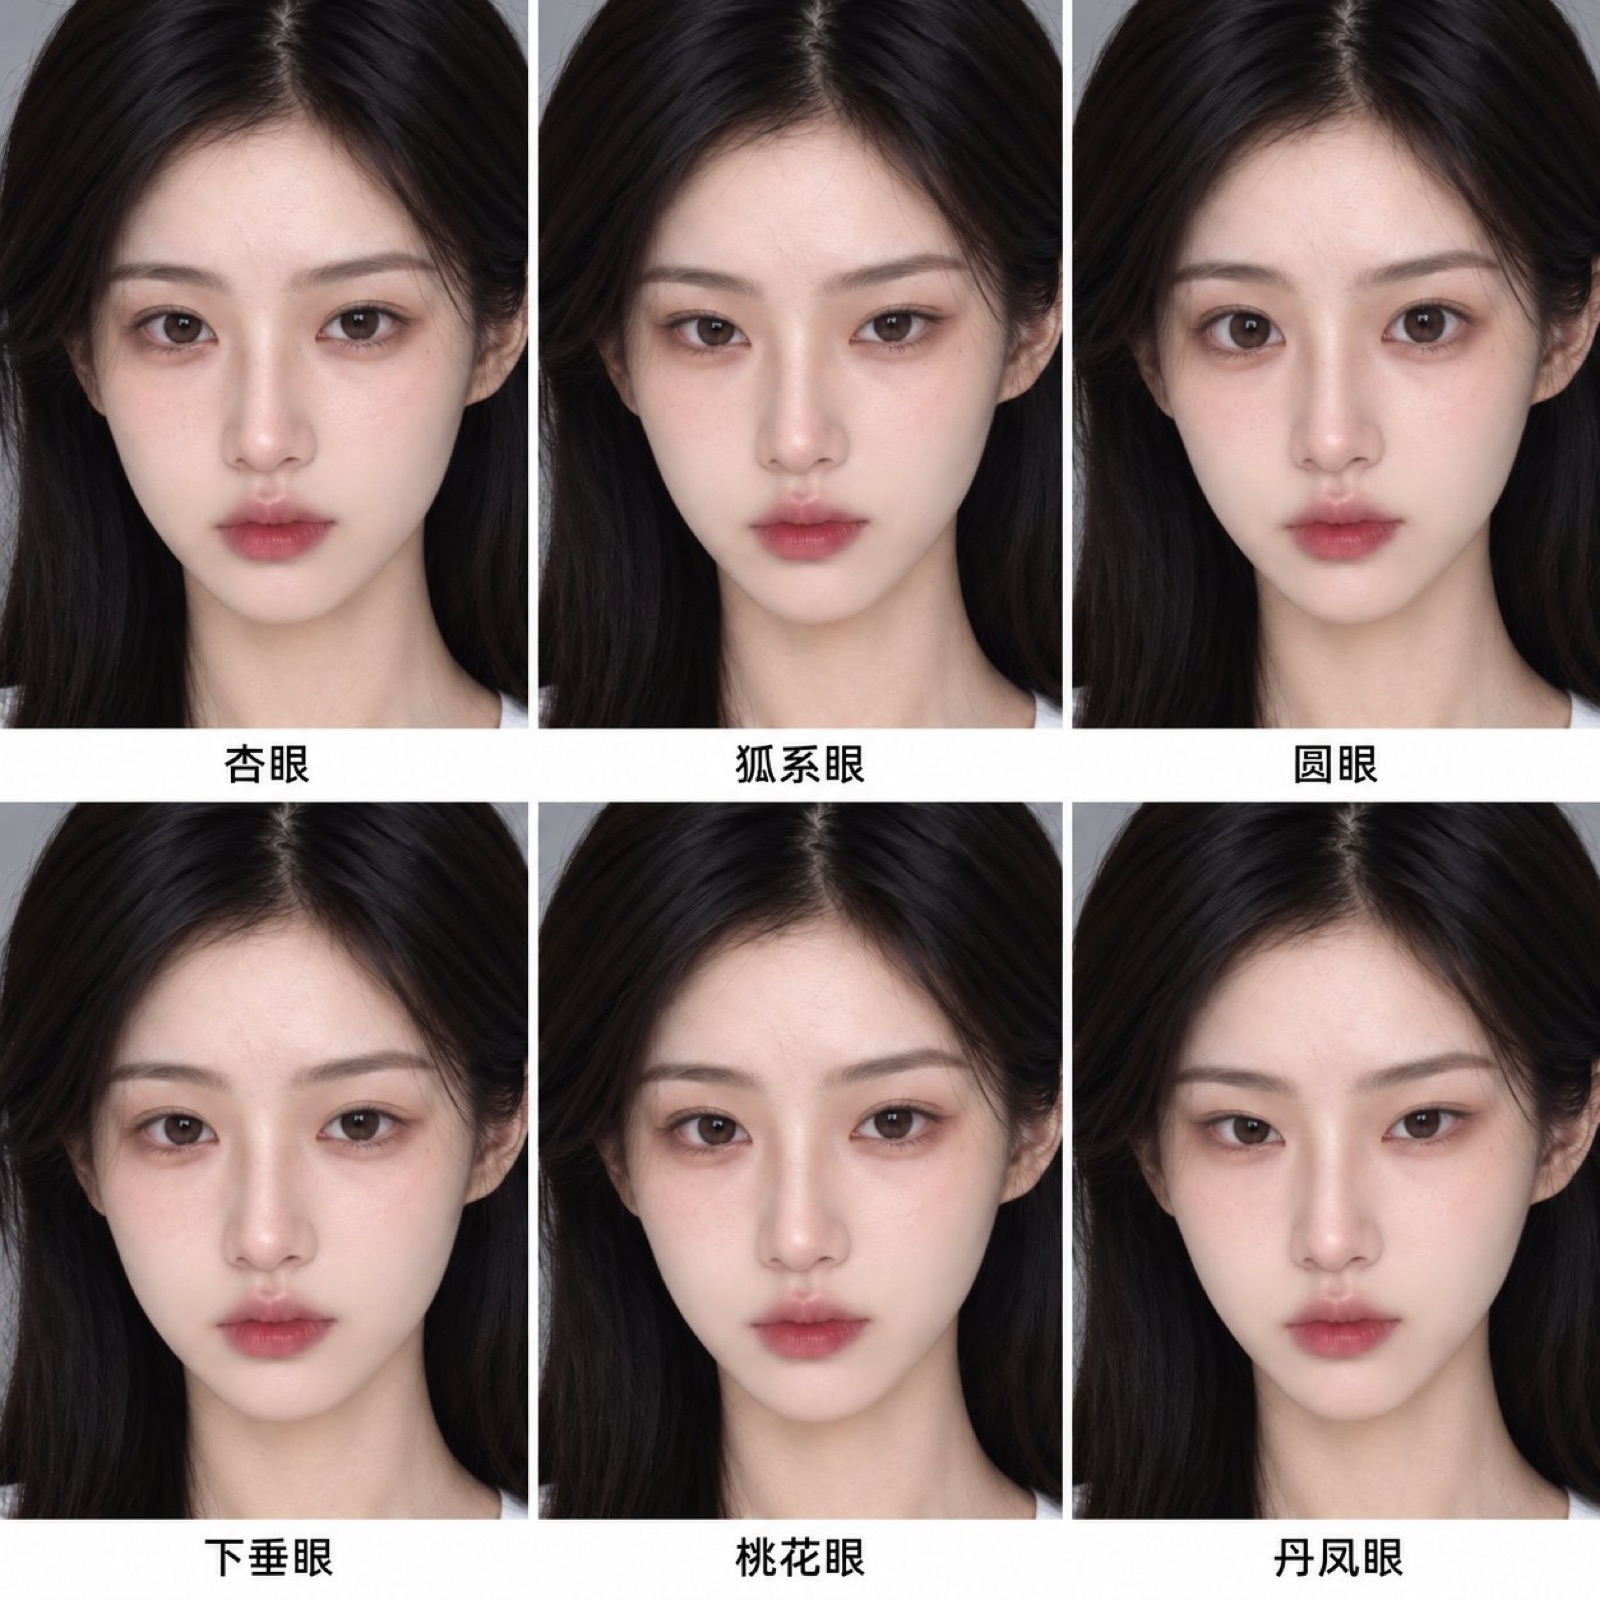
【Prompt, Upload Base Image】A 3-column by 2-row 6-panel comparison grid, all 6 panels featuring close-up frontal portraits of the identical female subject from the reference image, framed from forehead to chin, with face shape, eyebrows, nose, lips, skin tone, hair, background, lighting, and expression strictly identical; barefaced without eye makeup, looking straight into lens, each panel modifying only the eye shape. From left to right, top to bottom: Panel 1: Almond eyes, balanced proportions with gently rounded corners; Panel 2: Feline fox-eyes, sharp inner corners and elongated lifted outer corners; Panel 3: Large round doll eyes; Panel 4: Droopy puppy eyes with soft downward-angled outer corners; Panel 5: Peach blossom eyes with subtly upturned outer corners and faint warm flush; Panel 6: Slender Phoenix eyes, elongated upward tilt with narrow eyelid crease. Small clean black caption under each panel labeling the eye shape. Thin white dividers between panels, realistic photography, ultra-high definition, crisp eye detail, 1:1 aspect ratio
Next, select the eyelid type: monolid, hooded/inner double, or prominent outer double. Inner double eyelids look the most natural on East Asian portraits. Monolids are fantastic for high-fashion editorial uniqueness.
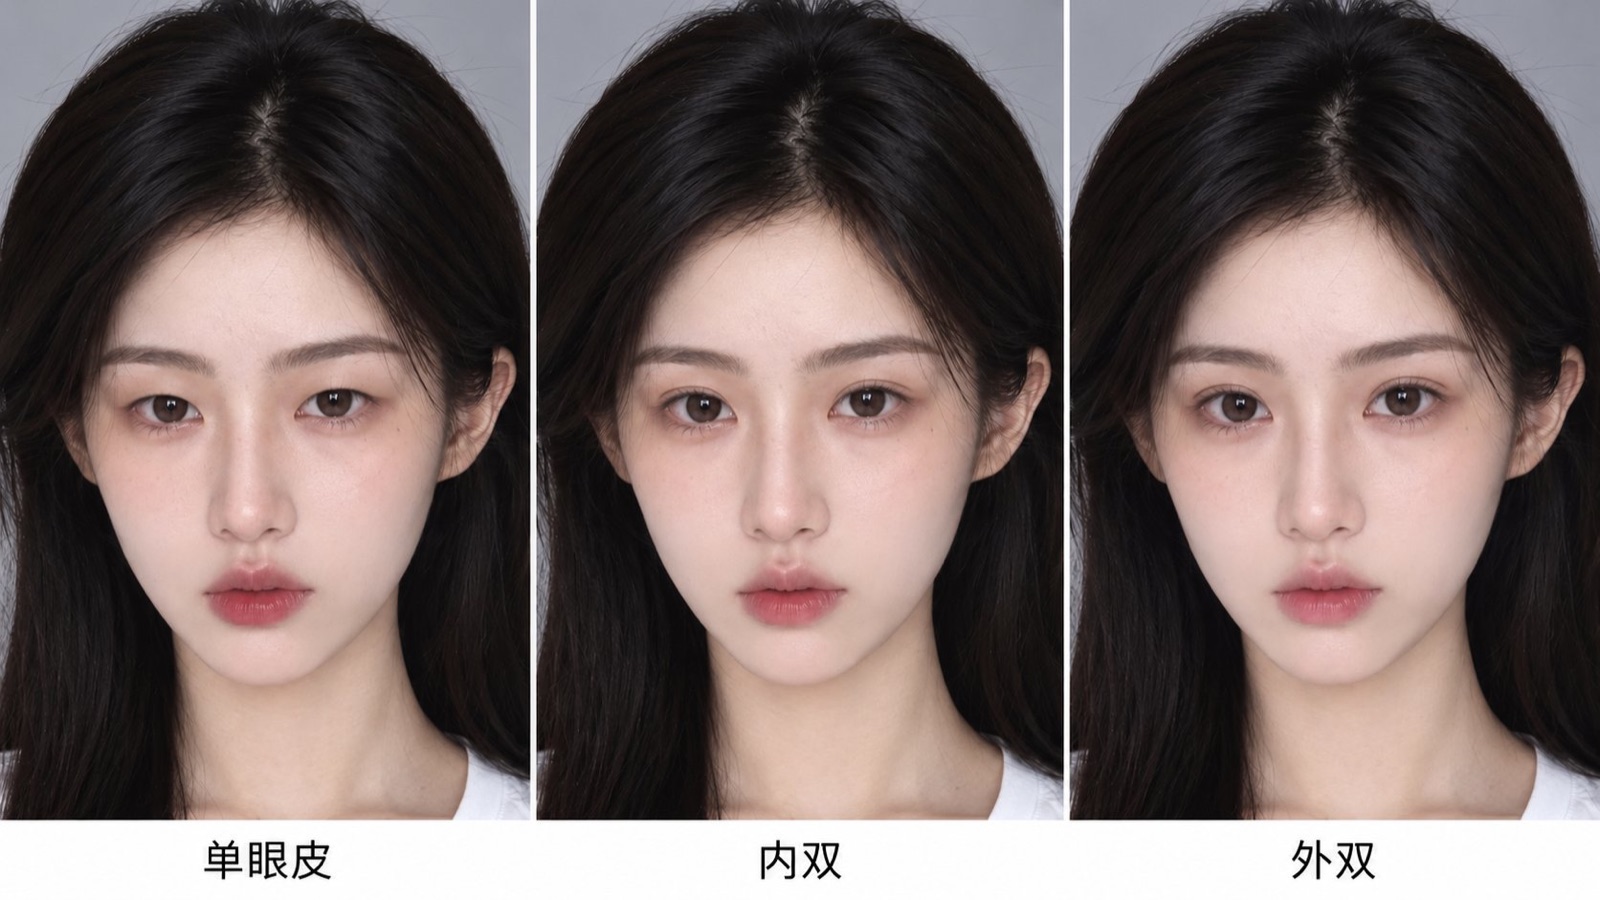
【Prompt, Upload Base Image】A 3-column by 1-row 3-panel horizontal comparison grid, all 3 panels featuring close-up frontal portraits of the identical female subject from the reference image, with identical eye shape, brows, face shape, nose, lips, skin tone, hair, background, and lighting; barefaced without makeup, eyes naturally open looking into lens, each panel modifying only the eyelid fold. Panel 1: Monolid, smooth upper eyelid without crease; Panel 2: Hooded/inner double eyelid, very narrow subtle crease tucked under upper eyelid rim; Panel 3: Parallel outer double eyelid, distinct defined eyelid crease clearly visible from inner to outer corner. Small clean black caption under each panel labeling the eyelid type. Thin white borders between panels, realistic photography, high definition, clear eyelid crease detail, 16:9 aspect ratio
Nose
Keep nose descriptions minimal. Over-specifying nose geometry easily produces a synthetic, surgically altered look. One or two descriptors are plenty:
- Narrow Straight Bridge: Three-dimensional and sculpted. The most common prompt choice.
- Upturned Button Nose: Slightly lifted tip, youthful and playful.
- Soft Rounded Tip: Slightly shorter bridge, gentle and cute.
- Gentle Low Bridge: Realistic, soft, and authentic to everyday Asian facial structure.
- Subtle Dorsal Hump: A slight bump along the middle of the bridge. Creates a gorgeous, memorable side profile.
- Natural Wide Alar: Approachable and grounded; looks exceptionally realistic in candid street snaps.
Tip: If your generated characters all look like they share the same plastic nose, it’s because “high straight nose bridge” is overused. Switching to a subtle dorsal hump or a soft low bridge immediately breaks the generic AI look.
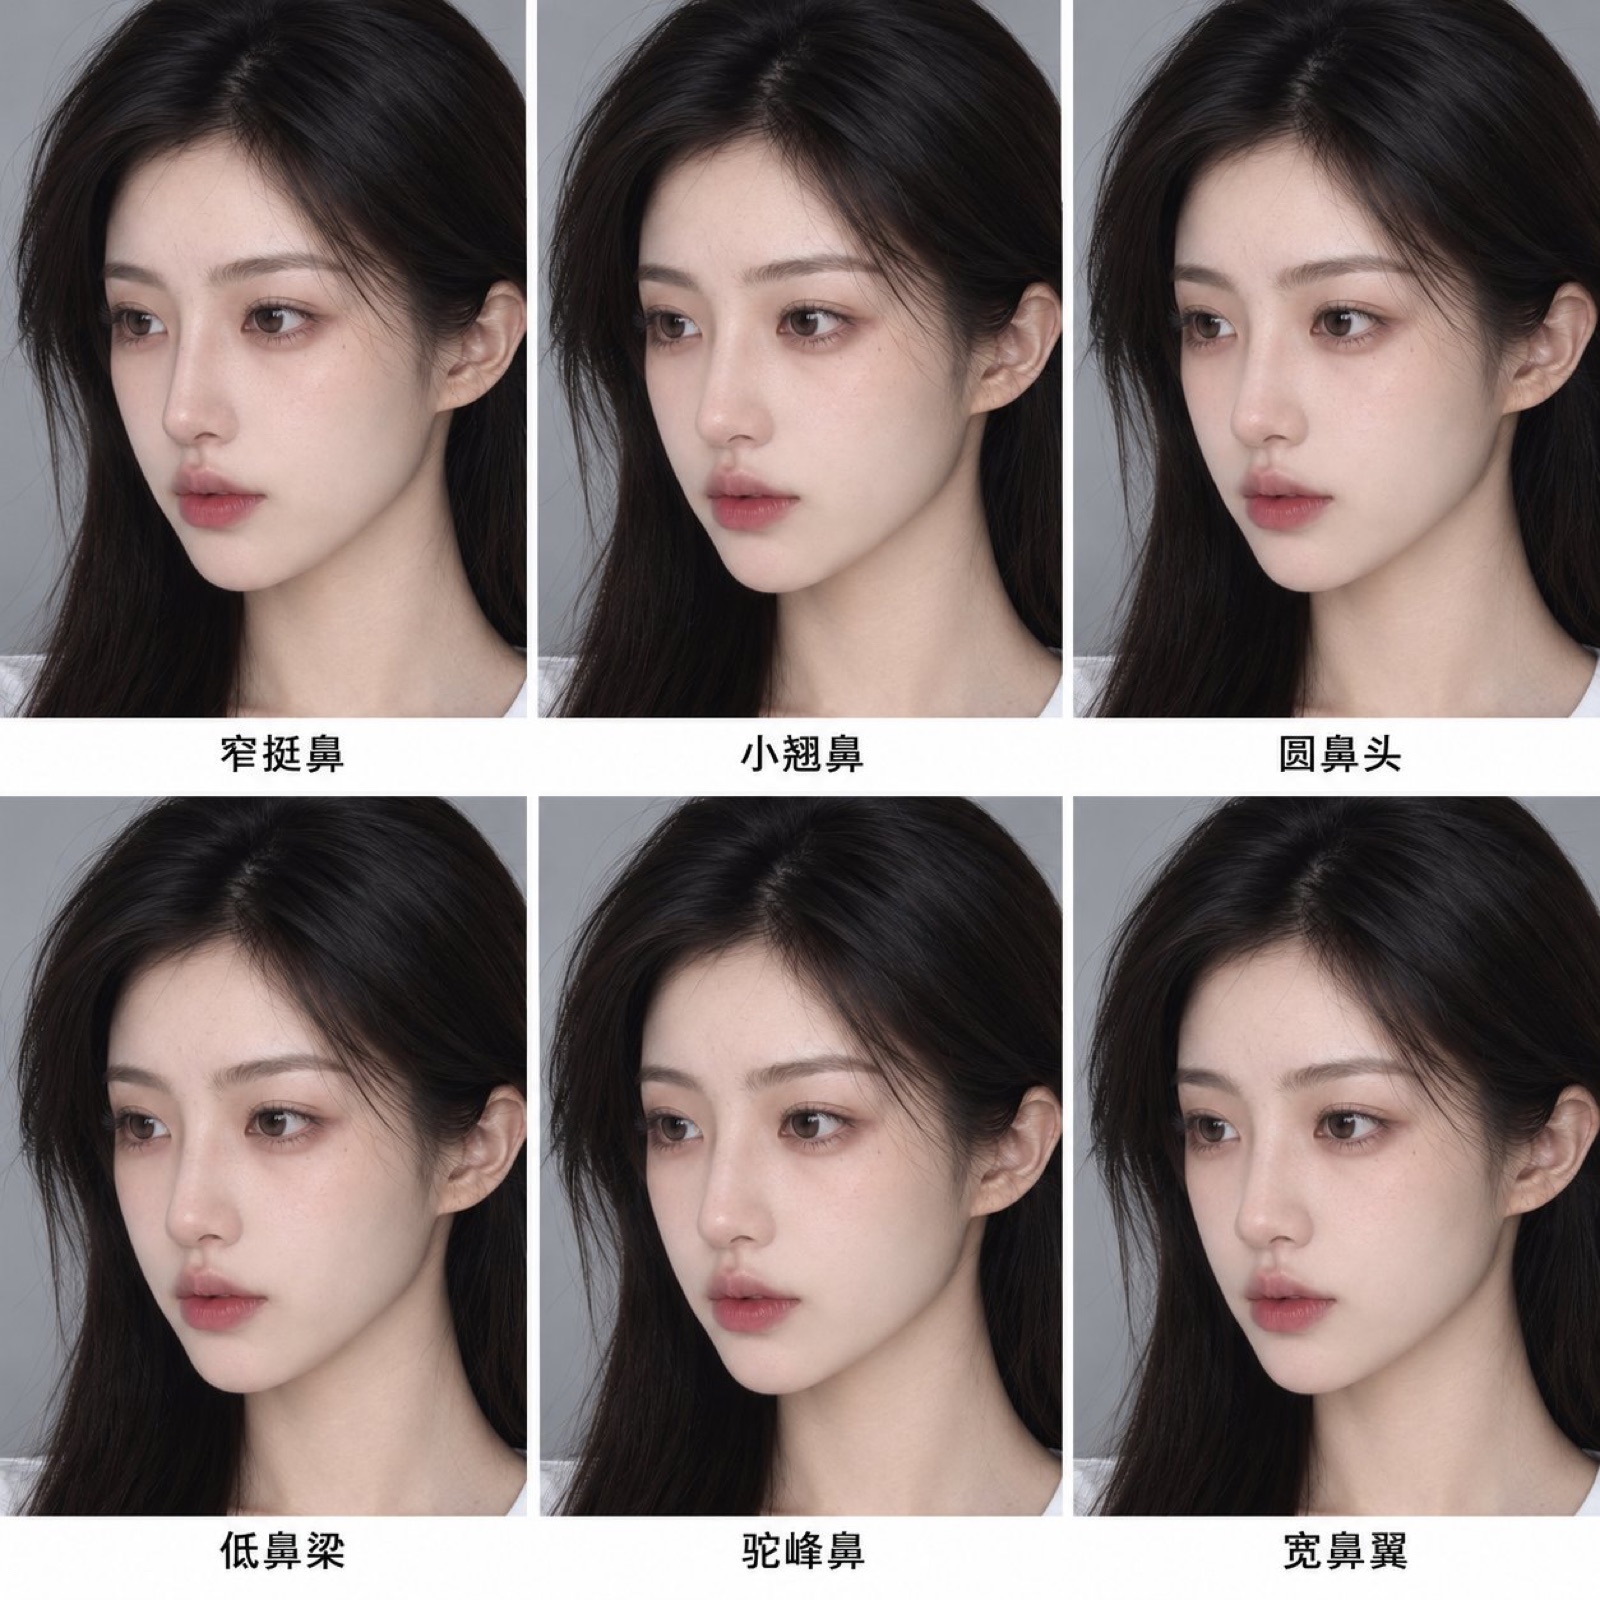
【Prompt, Upload Base Image】A 3-column by 2-row 6-panel comparison grid, all 6 panels featuring three-quarter angle close-up portraits of the identical female subject from the reference image, head turned 30 degrees to frame-left to clearly reveal nose bridge height and tip profile, with face shape, eyebrows, eyes, lips, skin tone, hair, background, and lighting completely identical, each panel modifying only the nose geometry. From left to right, top to bottom: Panel 1: Slim straight bridge with compact refined tip; Panel 2: Dainty upturned button nose with slightly lifted tip; Panel 3: Soft rounded nose tip with slightly shorter bridge; Panel 4: Gentle low bridge with soft natural contours; Panel 5: Subtle dorsal hump on mid-bridge with defined aristocratic profile; Panel 6: Natural wider nasal alar wings with relaxed soft tip. Small clean black caption under each panel labeling nose type. Thin white panel dividers, realistic photography, ultra-high definition, detailed nose contours, 1:1 aspect ratio
Lips
Describe lip anatomy only—never specify lipstick colors here. Lipstick is styling that changes per shoot; hardcoding it here burns it into your character card permanently.
- Thin Lips: Restrained, aloof, and cool.
- Plush Full Lips: Sensual, prominent, great for editorial beauty.
- Defined M-Cupid’s Bow: Sculpted lip peaks and clean contours. Very photogenic.
- Natural Smile Contour: Naturally upturned lip corners even when resting.
- Prominent Tubercle: A gentle central protrusion on the upper lip, adding sweet three-dimensional volume.
- Petite Lips: Smaller overall horizontal width, doll-like when paired with round eyes.
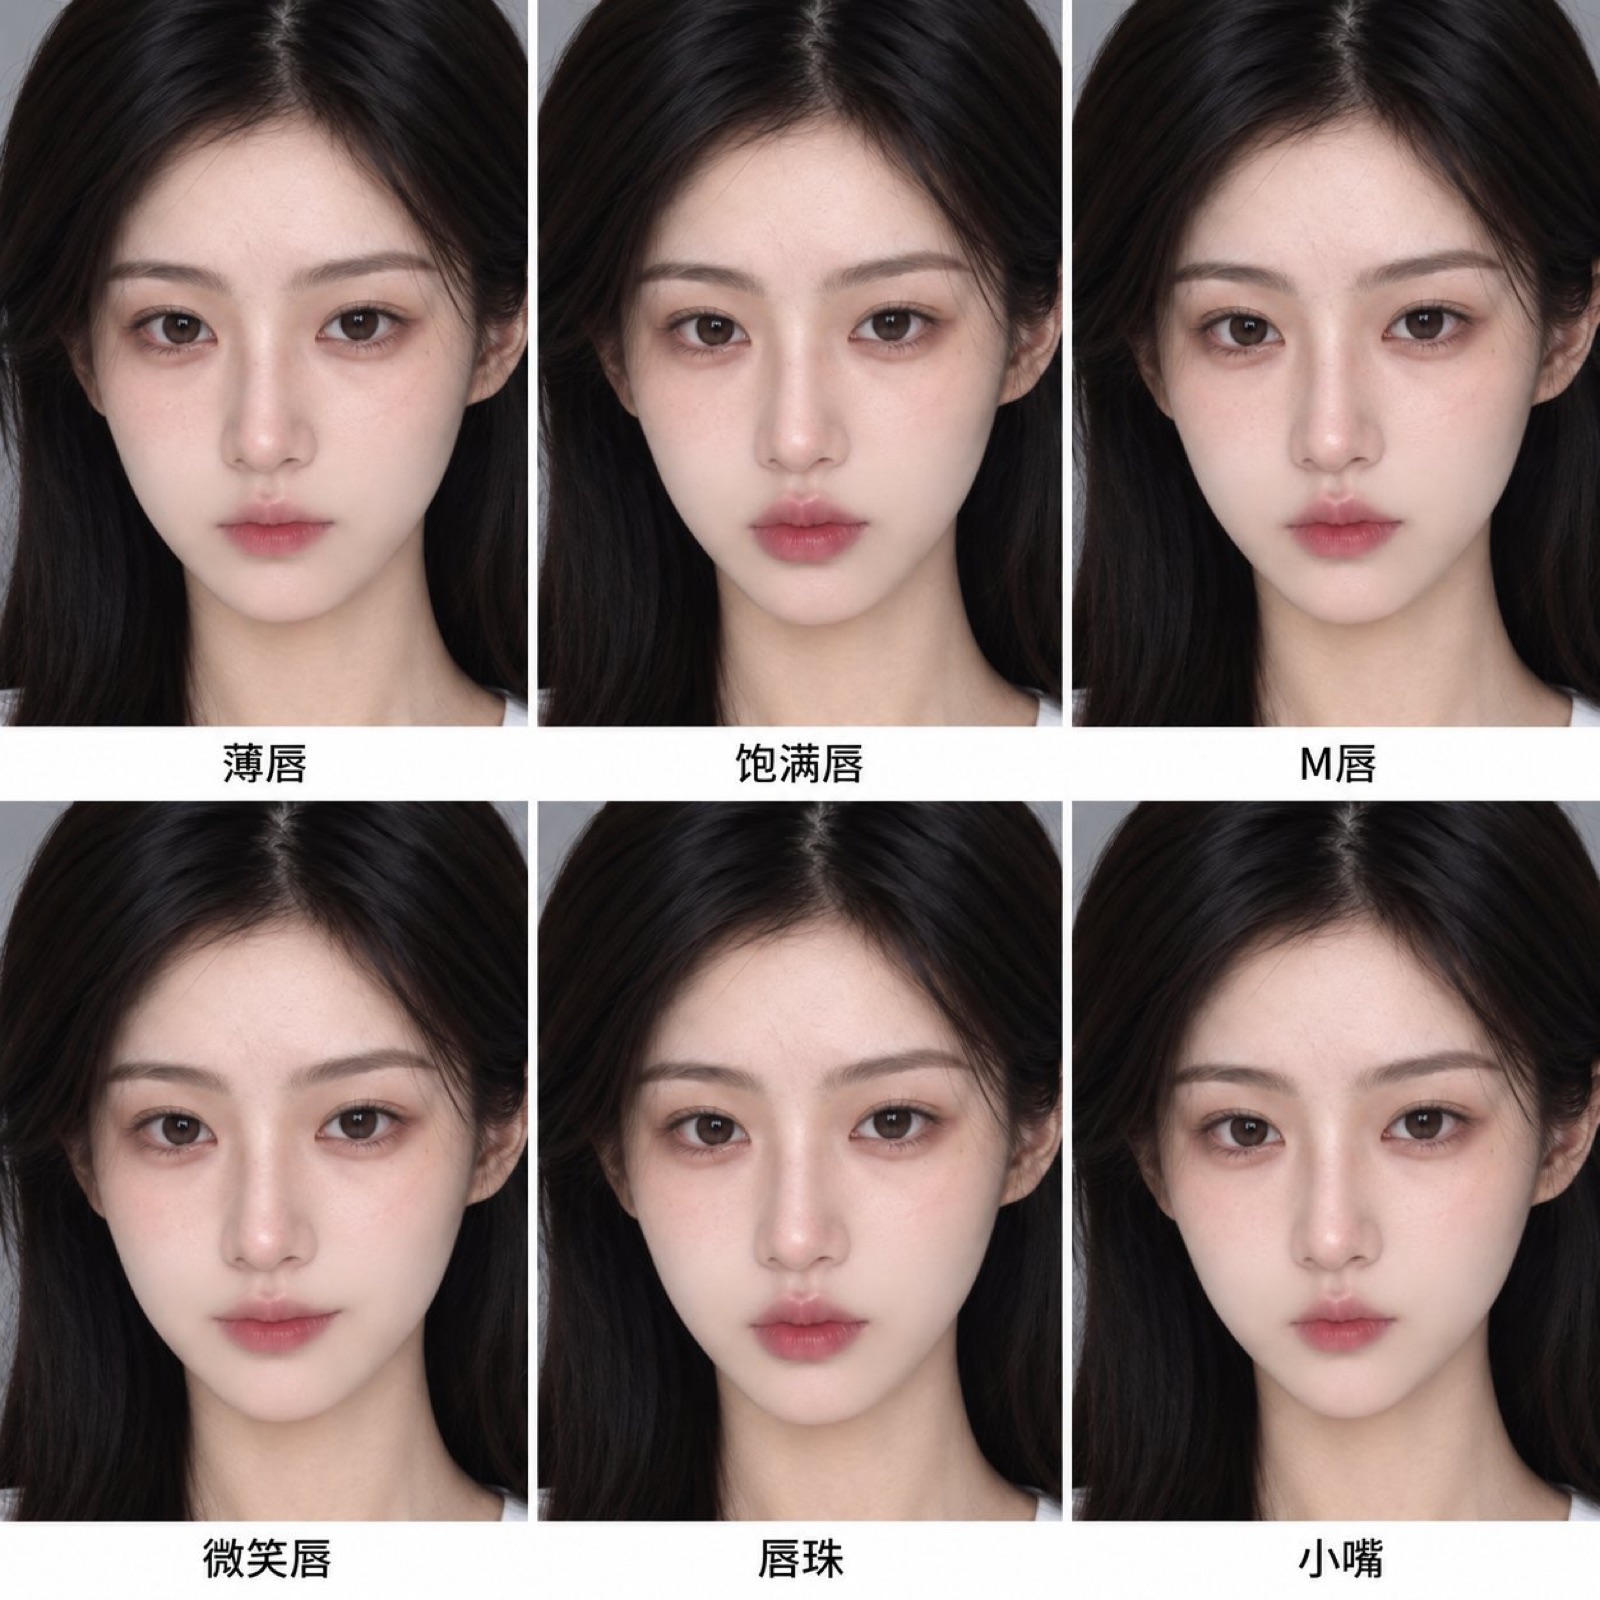
【Prompt, Upload Base Image】A 3-column by 2-row 6-panel comparison grid, all 6 panels featuring close-up frontal portraits of the identical female subject from the reference image, cropped from forehead to chin, with identical face shape, brows, eyes, nose, skin tone, hair, background, and lighting; lips naturally closed in neutral expression, lip color uniformly soft natural bare nude-pink, each panel altering only lip geometry. From left to right, top to bottom: Panel 1: Thin refined lips with modest vermilion border; Panel 2: Full plush lips with balanced upper and lower volume; Panel 3: Defined M-shaped cupid’s bow with crisp lip contours; Panel 4: Natural smile-shaped lips with naturally upturned corners at rest; Panel 5: Defined central tubercle on upper lip creating sweet dimensional fullness; Panel 6: Petite compact lips with smaller overall horizontal width. Small clean black text under each panel labeling lip shape. Thin white divider lines, realistic photography, ultra-high definition, clear lip texture, 1:1 aspect ratio
Skin Complexion & Texture
Skin is split into two components: undertone and surface texture.
Undertones: Cool porcelain, warm ivory, natural golden-beige, sun-kissed wheat-tan, and rosy flushed. Cool porcelain is heavily overused across AI portraits. Switching to warm ivory or natural golden-beige immediately makes your character feel grounded and distinct.
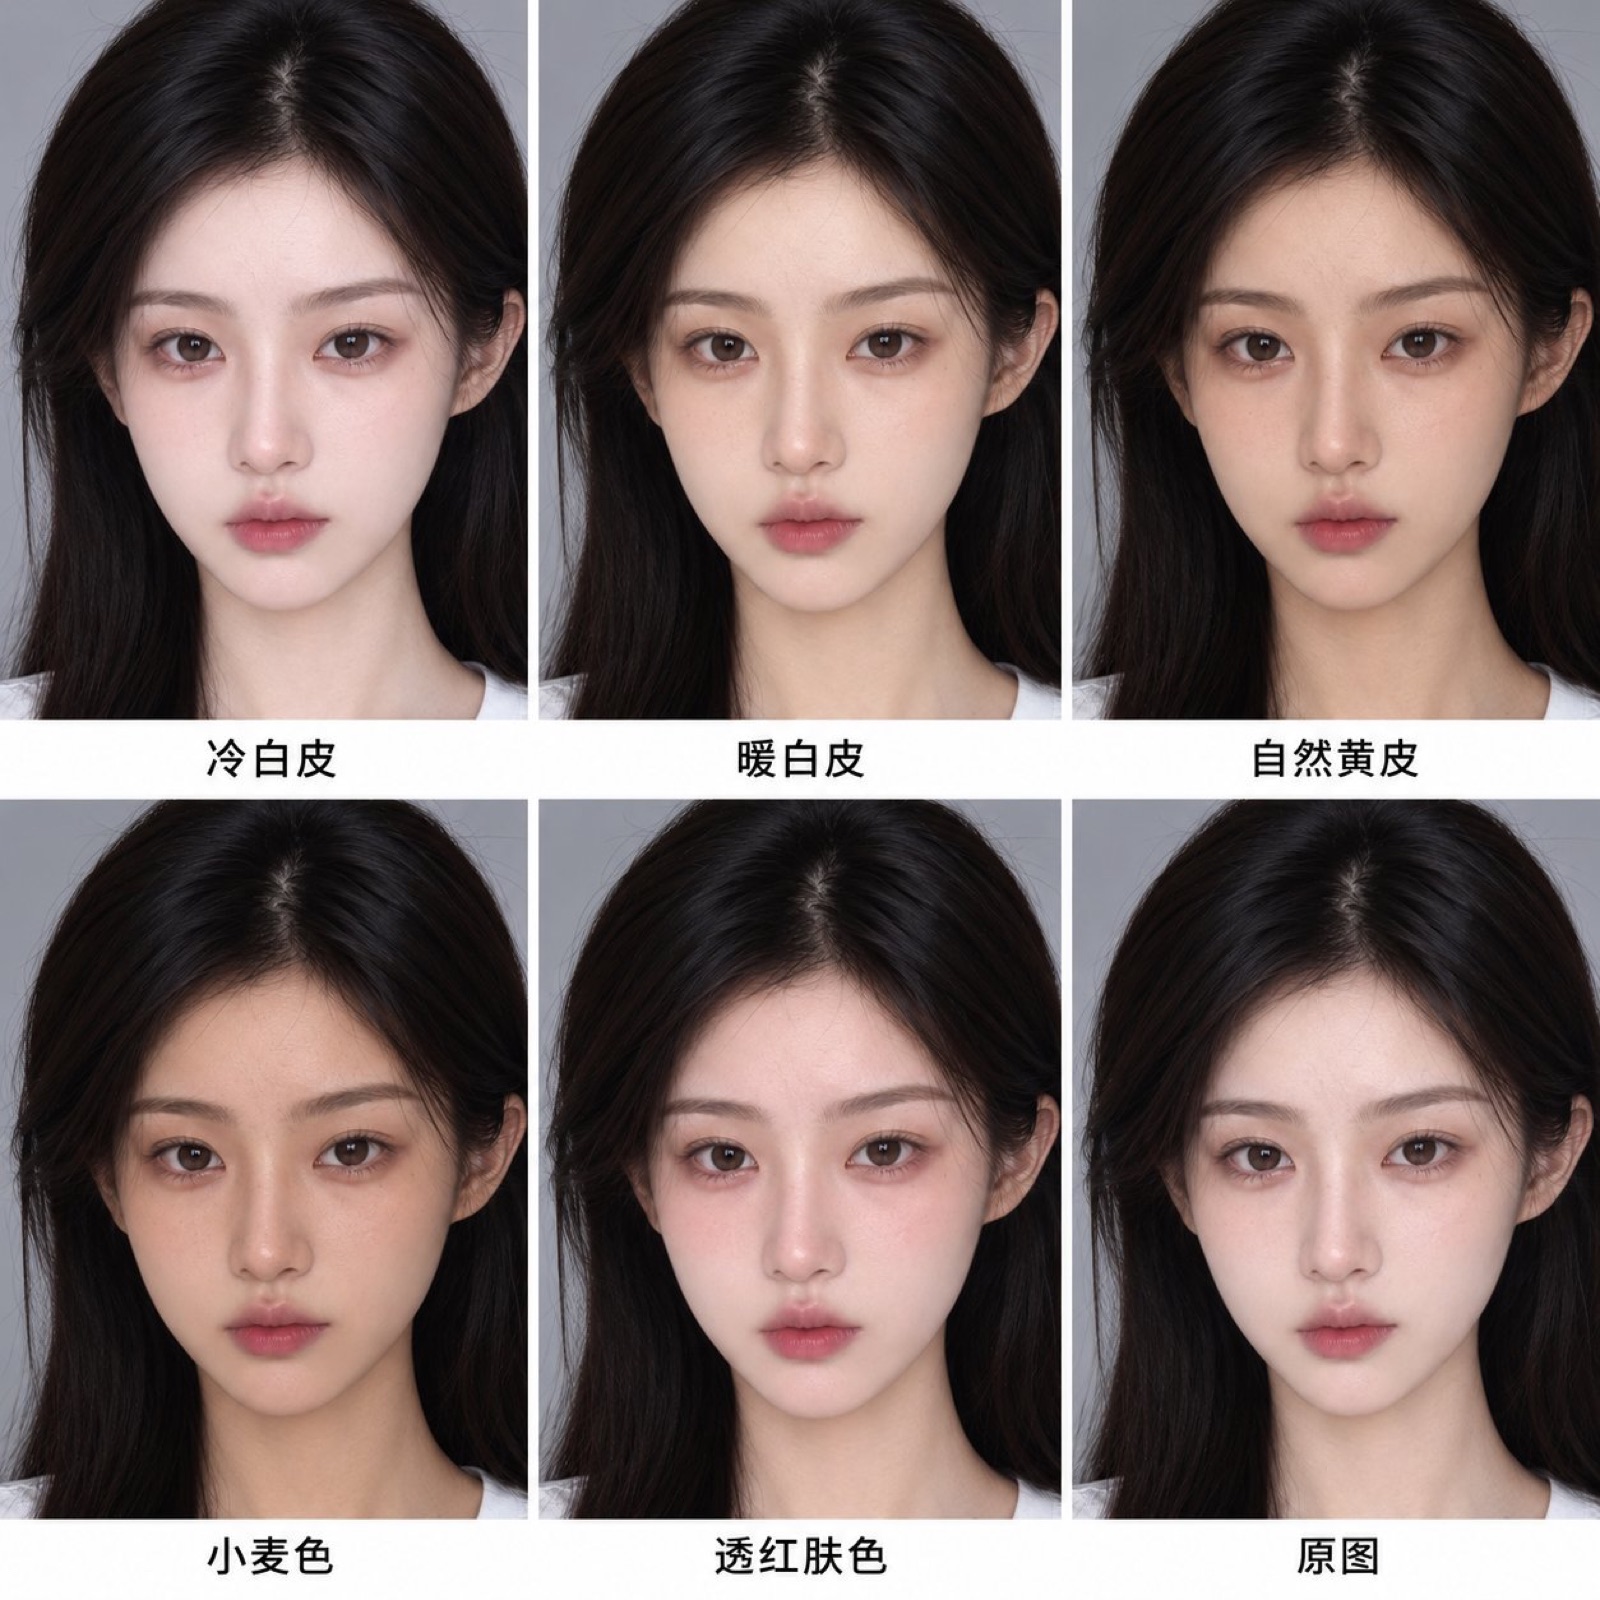
【Prompt, Upload Base Image】A 3-column by 2-row 6-panel comparison grid, all 6 panels featuring the identical female subject from the reference image, with facial features, face shape, hair, white t-shirt, light-grey background, frontal lighting, expression, and composition identical, neutral color temperature studio white light throughout, each panel altering only the skin complexion. From left to right, top to bottom: Panel 1: Cool porcelain fair skin with subtle cool-pink undertones; Panel 2: Warm ivory fair skin with gentle warm golden undertones; Panel 3: Natural balanced Asian golden-beige complexion; Panel 4: Sun-kissed golden wheat-tan skin tone; Panel 5: Translucent flushed complexion with natural rosy warmth across cheeks and nose bridge; Panel 6: Original reference skin tone unchanged. Small clean black caption under each panel labeling skin tone. Thin white borders between panels, realistic studio photography, high definition, real skin texture preserved, 1:1 aspect ratio
Texture: Dewy glass skin, soft matte velvet, authentic skin with fine visible pores, or light freckles. For your baseline reference image, always prompt for preserving authentic skin texture with visible micro-pores. Never prompt for “poreless” skin—it guarantees an artificial wax-figure look.
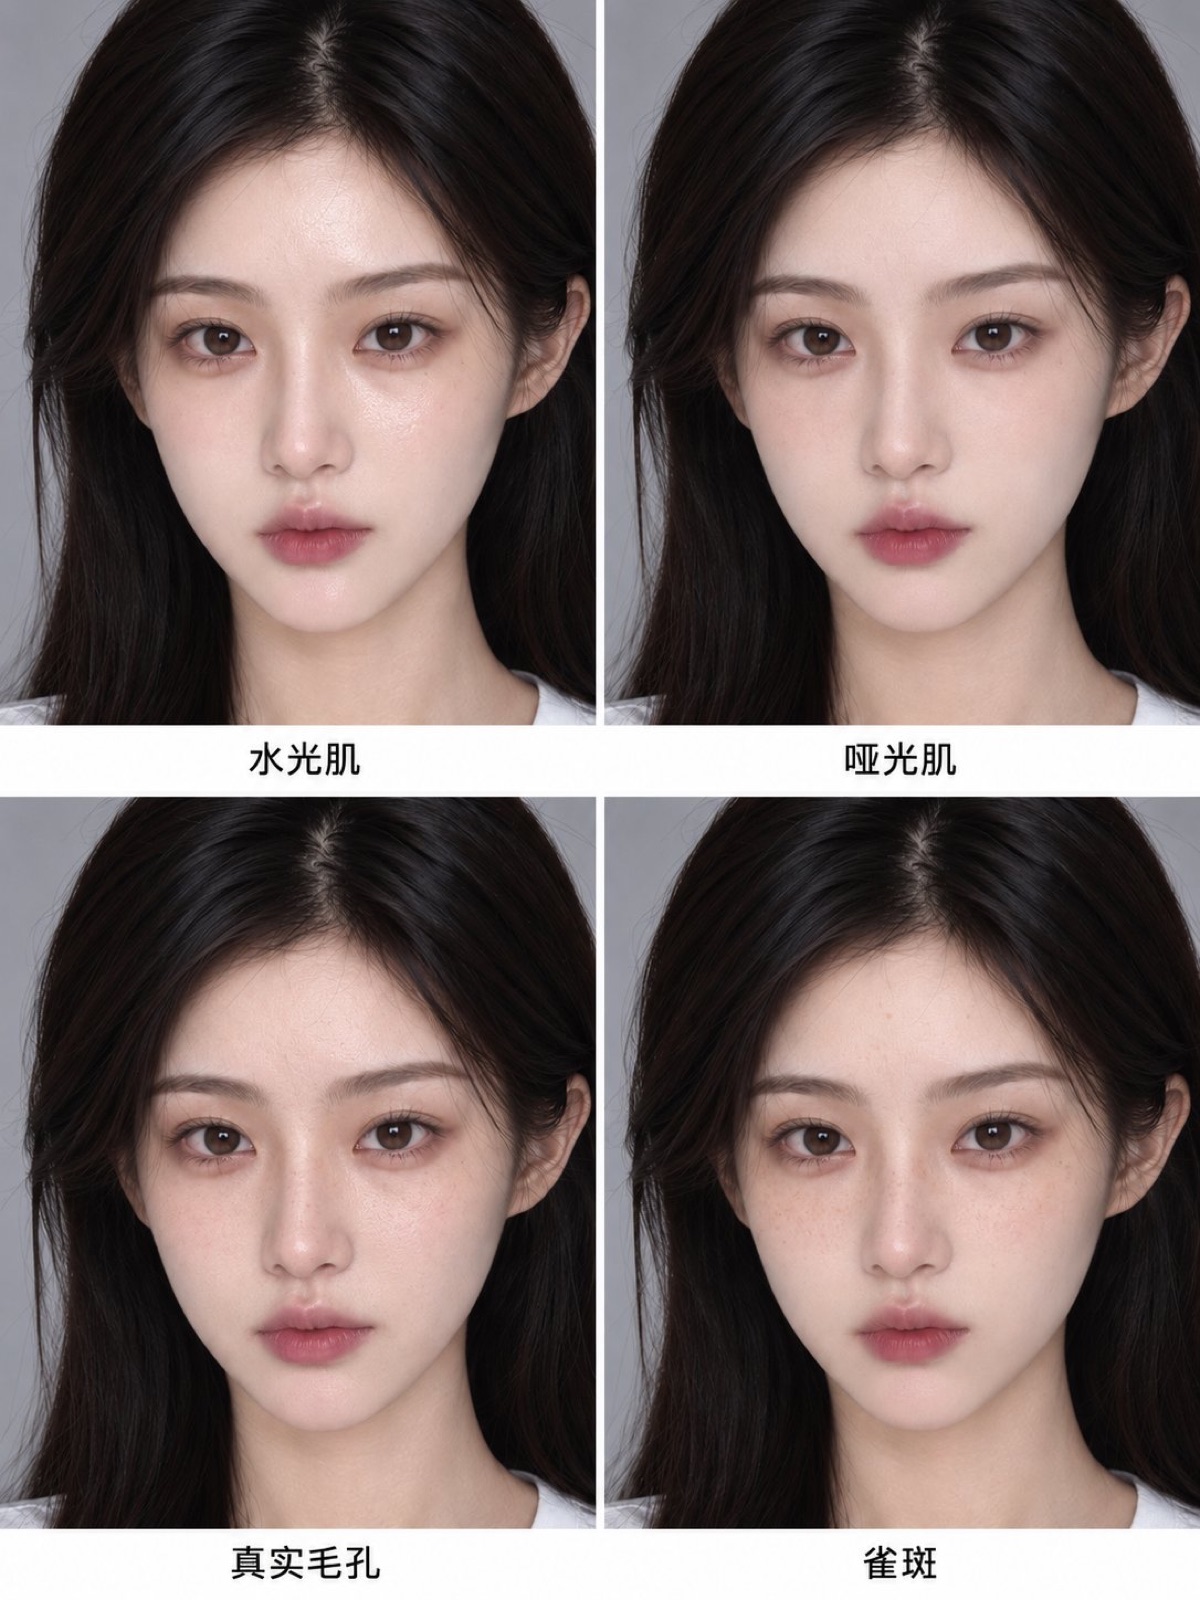
【Prompt, Upload Base Image】A 2-column by 2-row 4-panel comparison grid, all 4 panels featuring close-up frontal portraits of the identical female subject from the reference image, with identical facial features, face shape, skin tone, hair, background, and lighting; barefaced, each panel modifying only skin surface texture. From left to right, top to bottom: Panel 1: Dewy glass skin, moist luminous sheen across cheekbones and bridge of nose; Panel 2: Soft matte velvet skin, diffused finish with zero oily shine; Panel 3: Authentic skin texture, subtle visible fine pores and natural microscopic texture along nose and inner cheeks; Panel 4: Sun-dusted freckles, light scattered freckles across nose bridge and upper cheeks. Small clean black caption under each panel labeling skin texture. Thin white borders between panels, realistic photography, ultra-high definition, crisp skin detail, 3:4 aspect ratio
The Anchor Mark: Give Her a Distinct Feature
Once all features are chosen, give her one distinct visual anchor: a tiny beauty mark below the left eye, a mole above the upper lip, a mark at the brow tail, or a single cheek dimple.
This mark acts as a visual signature. It helps diffusion models maintain character identity across diverse angles and lighting setups, while making her instantly memorable to human viewers. Always specify the exact location (directly below the left eye, just above the right side of upper lip), otherwise the model will move it around between shots.
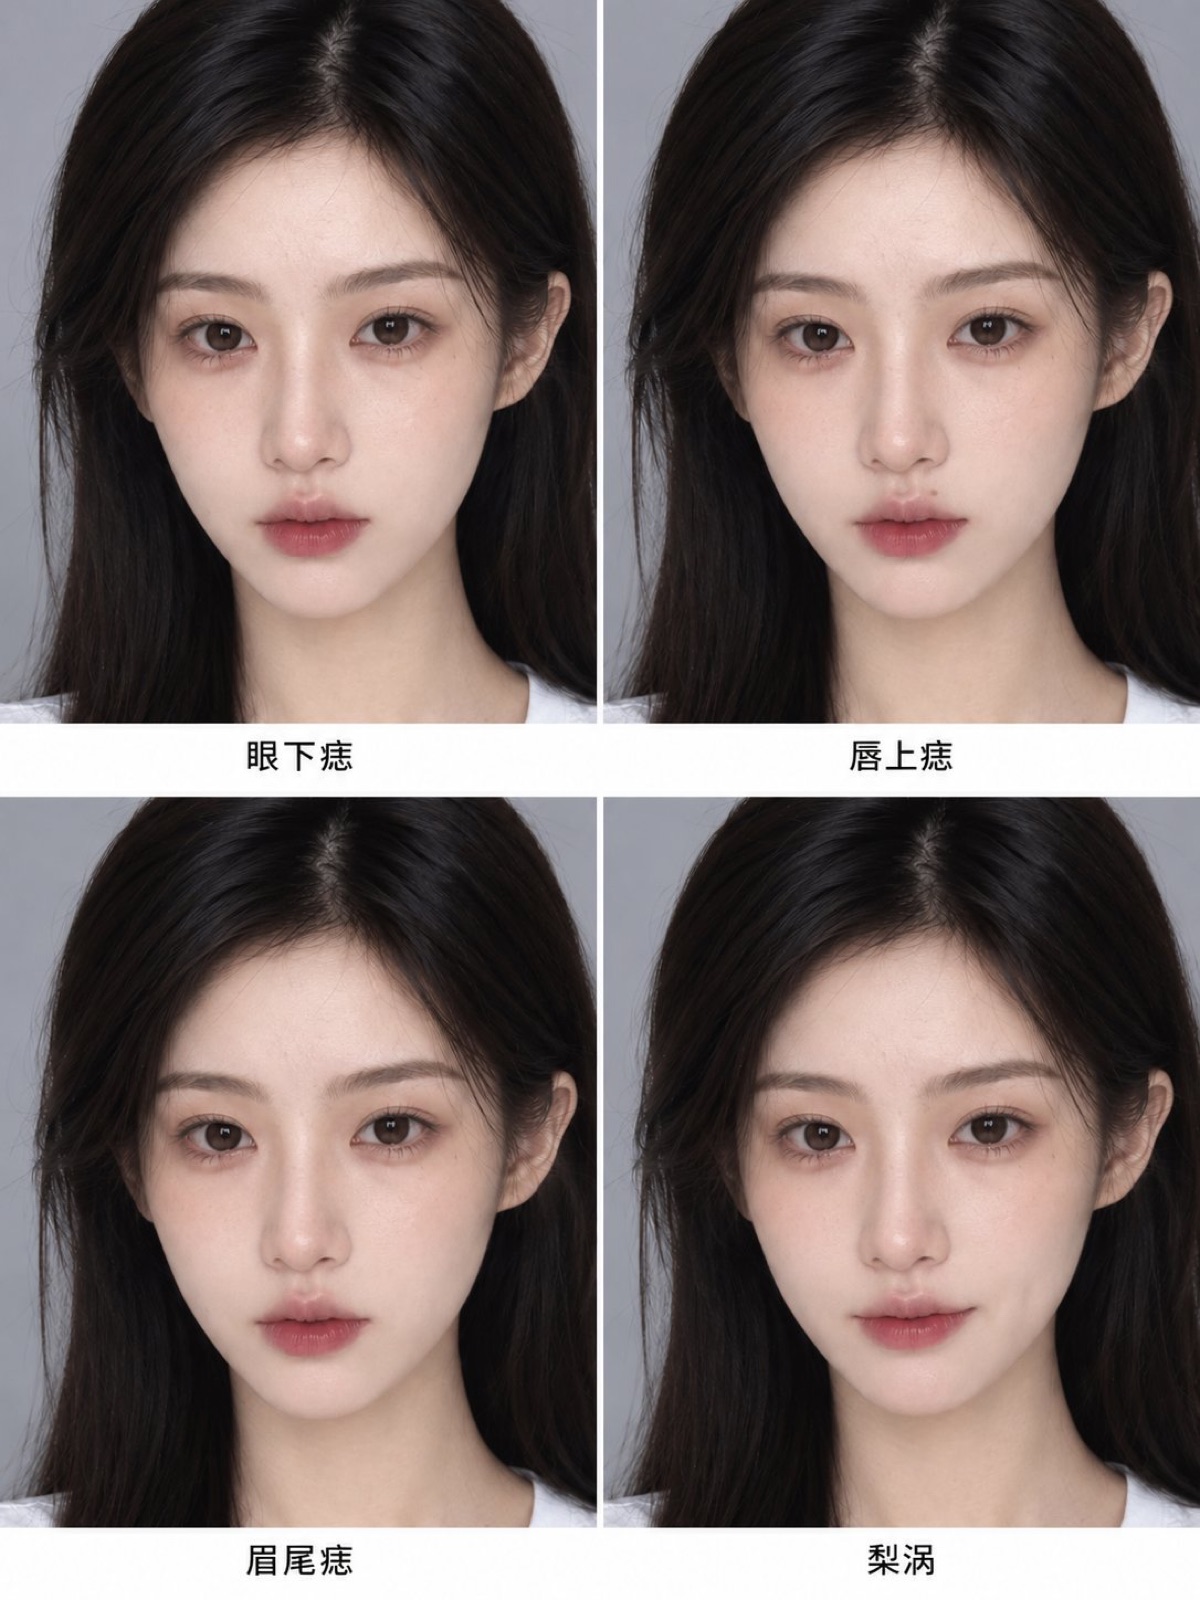
【Prompt, Upload Base Image】A 2-column by 2-row 4-panel comparison grid, all 4 panels featuring close-up frontal portraits of the identical female subject from the reference image, with identical features, face shape, skin tone, hair, background, and lighting; each panel adding one distinct visual anchor mark. From left to right, top to bottom: Panel 1: Tiny light-brown beauty mark directly below the left eye, neutral closed lips; Panel 2: Delicate beauty mark just above the right side of upper lip, neutral closed lips; Panel 3: Tiny light-brown mole at the outer tip of right eyebrow, neutral closed lips; Panel 4: Gentle soft smile revealing a single subtle dimple beside the right corner of mouth. Small clean black caption under each panel labeling the identifier. Thin white panel dividers, realistic photography, ultra-high definition, clear mark placement, 3:4 aspect ratio
Five Ready-to-Use Archetypes
If you want a starting point without picking every feature from scratch, here are five proven combinations:
- Cool Aloof: Narrow elongated oval face, straight slim eyebrows, feline fox eyes with inner double lids, slim straight nose bridge, thin lips with defined cupid’s bow, cool porcelain skin, tiny mole under left eye.
- Sweet Ingenue: Petite round face with soft apple cheeks, curved crescent brows, round doll eyes with prominent aegyo sal, small button nose, compact lips with defined tubercle, rosy flushed skin, subtle single right dimple.
- Alt-Sweet Chic: Tapered heart face with clean jawline, high-arched brows, lifted fox eyes, dainty upturned nose, full lips, warm ivory skin, tiny beauty mark above lip.
- Tender Gentle: Classic oval face with soft chin, natural feathered brows, droopy puppy eyes with hooded lids, gentle low bridge nose, natural smiling lips, warm ivory skin with subtle freckles.
- Striking Androgynous: Defined narrow jawline, bold straight brows, slender monolid Phoenix eyes, subtle dorsal hump nose bridge, lean lips, natural olive skin, tiny mole at outer brow tail.
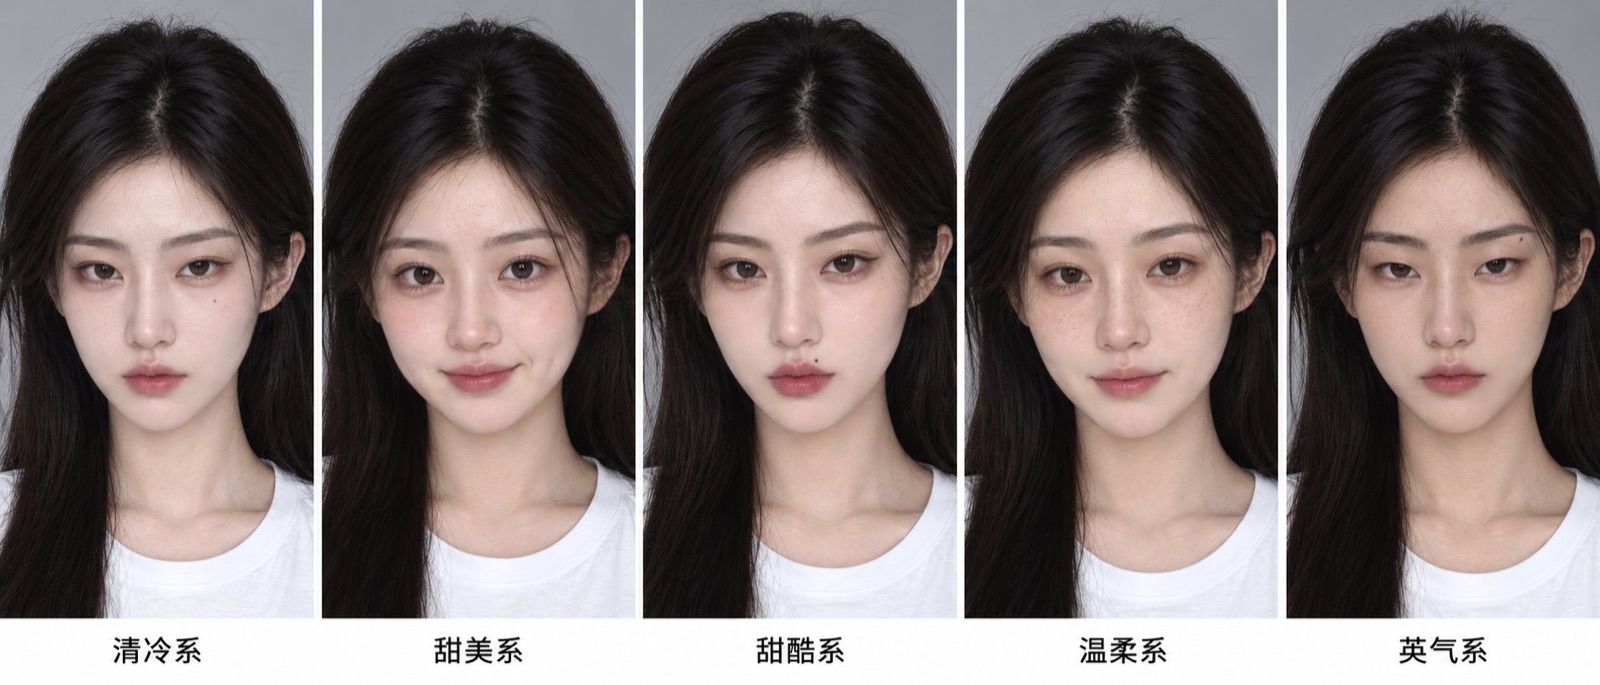
【Prompt, No Reference Image】A 5-column by 1-row horizontal comparison grid, 5 panels featuring 5 distinct 22-year-old young adult women, all with dark straight hair tucked behind ears, barefaced, wearing plain white crew-neck t-shirts, light-grey background, front-facing eye-level perspective, head and shoulders portrait, soft even frontal light, relaxed neutral expression. Panel 1 Cool Aloof: Narrow elongated oval face, straight slim eyebrows, feline fox eyes with inner double lids and lifted corners, slim straight nose bridge, thin lips with defined cupid’s bow, cool porcelain skin, tiny mole under left eye. Panel 2 Sweet Ingenue: Petite round face with soft apple cheeks, curved crescent brows, round double-eyelid doll eyes with prominent aegyo sal, small rounded button nose, compact lips with defined tubercle, rosy flushed skin, subtle single right dimple in soft smile. Panel 3 Alt-Sweet: Tapered heart face with clean jawline, high-arched brows, lifted fox eyes, dainty upturned nose, full lips, warm ivory skin, tiny beauty mark above lip. Panel 4 Tender Gentle: Classic oval face with soft chin, natural feathered brows, droopy puppy eyes with hooded lids, gentle low bridge nose, natural smiling lips, warm ivory skin with subtle freckles. Panel 5 Striking Androgynous: Defined narrow jawline, bold straight brows, slender monolid Phoenix eyes, subtle dorsal hump nose bridge, lean lips, natural olive skin, tiny mole at outer brow tail. Clean small black caption under each panel labeling archetype. Thin white divider lines, realistic photography, high definition, real skin texture, 21:9 aspect ratio
Step 3: Write the Character Card
Now assemble your chosen features into a unified paragraph. This is your Character Card. It contains only immutable traits: age, facial bone structure, features, complexion, body proportions, visual anchor mark, and core aura. Wardrobe, hair color, and background must never appear in this card.
Here is the exact card for my character:
A 22-year-old young adult woman, narrow elongated oval face, subtly tapered chin, clean defined jawline, straight dark brown slender eyebrows, feline fox eyes with subtle hooded inner double lids, slightly upturned outer corners, prominent natural aegyo sal, light-brown irises, slim straight nose bridge with refined compact tip, thin lips with distinct cupid’s bow, cool porcelain fair skin, preserving authentic skin texture with visible micro-pores, petite head proportions, slender graceful neck and collarbones, tiny light-brown beauty mark directly beneath left eye, quiet aloof and serene expression.
Save this in a notes app and give her a name. Always copy from this master text rather than re-typing from memory, which leads to subtle prompt drift over time.
Step 4: Shoot the Master Reference Image
The master photo functions as her official passport ID photo. Every future generation will reference this image, so it must be as clean and neutral as possible.
Strip away all stylistic keywords: no vintage CCD filters, no overexposure, no film grain, no motion blur, no moody side-lighting. If you include blur or heavy shadows, the diffusion model interprets them as inherent facial features, and your downstream generations will get progressively mushier.
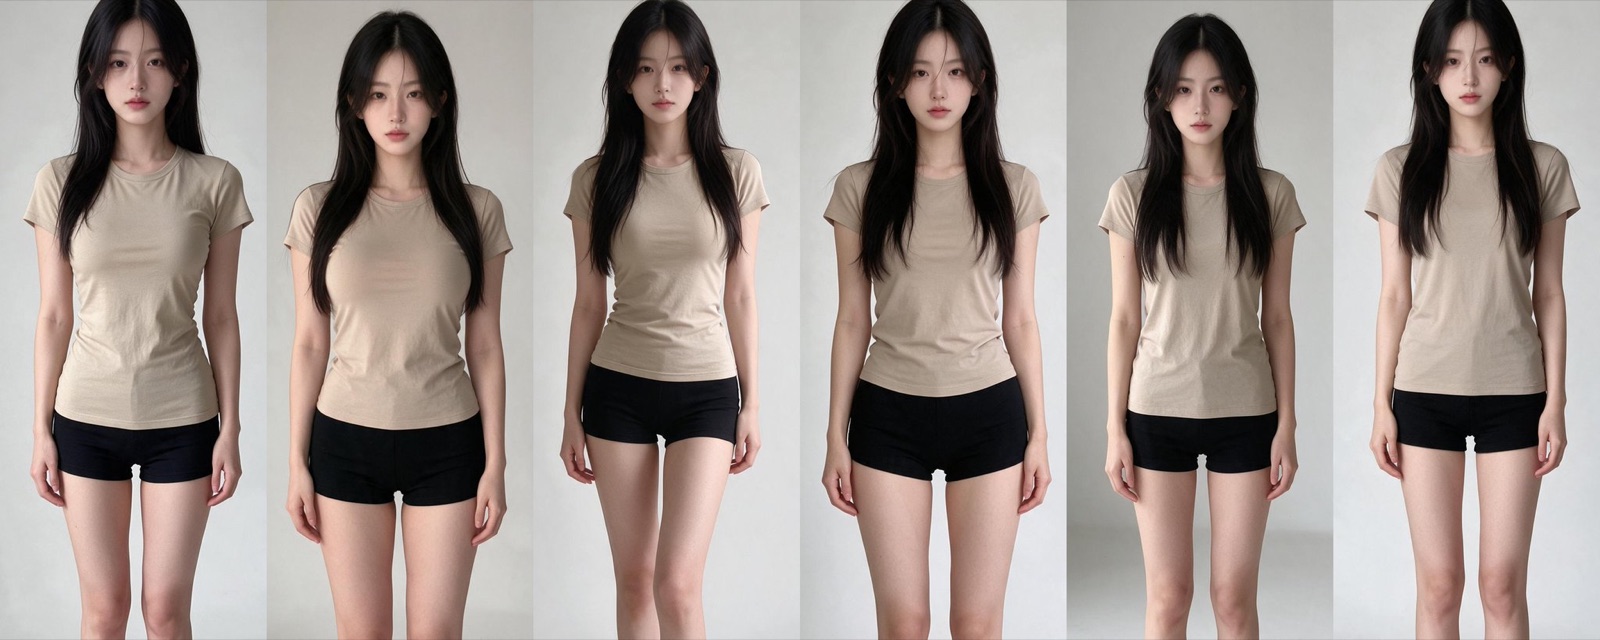
Keep hair simple: straight black hair tucked firmly behind the ears to leave the forehead and jawline completely visible. Use a plain white tee and a solid grey backdrop with diffuse, even frontal light.
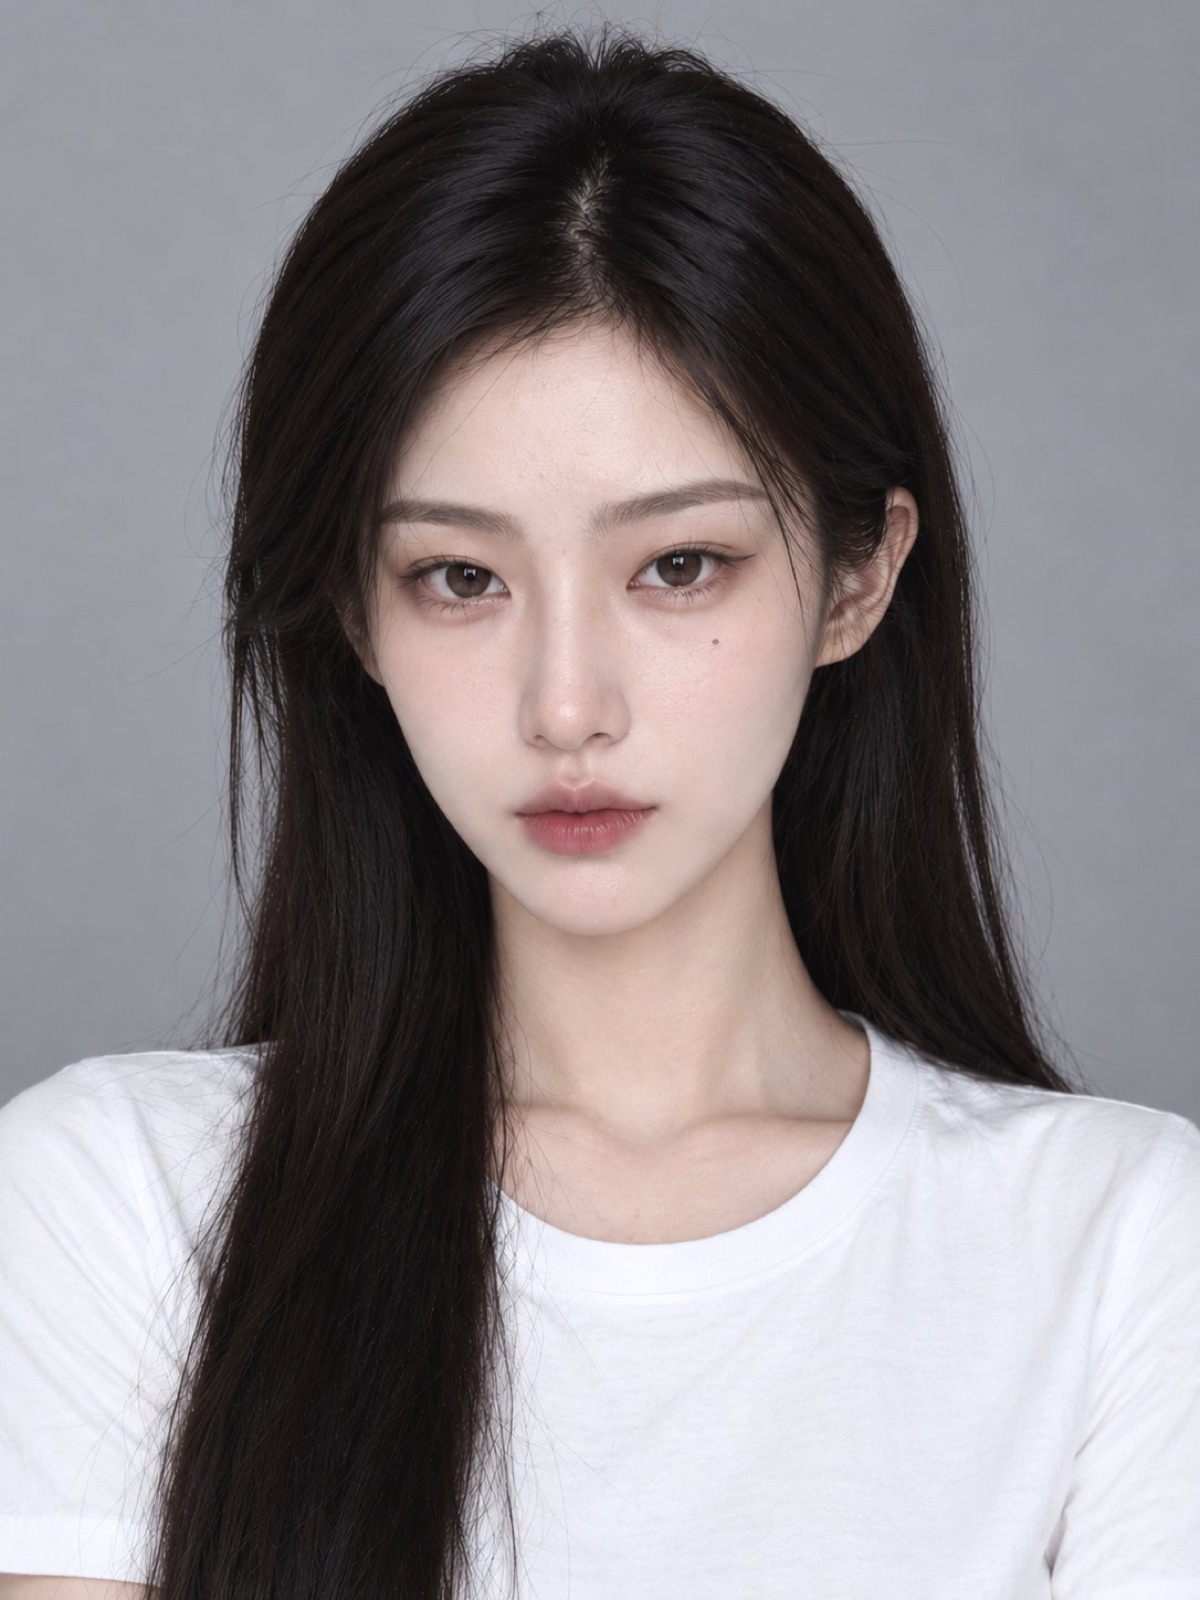
【Prompt, No Reference Image】A 22-year-old young adult woman, narrow elongated oval face, subtly tapered chin, clean defined jawline, straight dark brown slender eyebrows, feline fox eyes with subtle hooded inner double lids, slightly upturned outer corners, prominent natural aegyo sal, light-brown irises, slim straight nose bridge with refined compact tip, thin lips with distinct cupid’s bow, cool porcelain fair skin, preserving authentic skin texture with visible micro-pores, petite head proportions, slender graceful neck and collarbones, tiny light-brown beauty mark directly beneath left eye, quiet aloof and serene expression. Long straight dark hair naturally draped behind ears, completely exposing full forehead and both ears, minimal no-makeup makeup, plain simple white crew-neck t-shirt, solid neutral light-grey studio backdrop, front-facing eye-level camera framing, bust portrait from chest up, soft even frontal studio lighting, no harsh shadows on face, crisp clear facial features, completely unobstructed, relaxed neutral expression, lips gently closed, realistic studio photography, ultra-high definition, 3:4 aspect ratio, generate 4 individual separate photos, do not create a collage or grid
Step 5: Roll Multiple Candidates & Curate
Run the prompt to generate 8 to 12 candidates. Since image-to-image conditioning isn’t locked yet, each roll will offer slight variations.
Evaluate candidates against this checklist:
- Verify the character card: Are the eyes correct? Is the beauty mark in the exact prompted spot?
- Check symmetry: Is the mouth level? Are the eyes balanced?
- Check sharpness: Are features sharp and free of strange lighting artifacts?
- Gut check: You will be using this face for months—pick the one you genuinely love looking at.
Save the original lossless file (never use low-res screenshots). If none of the candidates hit the mark, edit the character card text instead of rerolling blindly.
Step 6: Supplementary Multi-Angle Reference Sheet
This step is optional but highly recommended. Upload your master photo and generate three additional poses: a three-quarter angle, a 90-degree profile, and a subtle closed-mouth smile.
When generating complex scenes later (looking back over shoulder, side profiles), passing this multi-angle sheet along with your primary reference prevents the model from improvising an inconsistent profile.
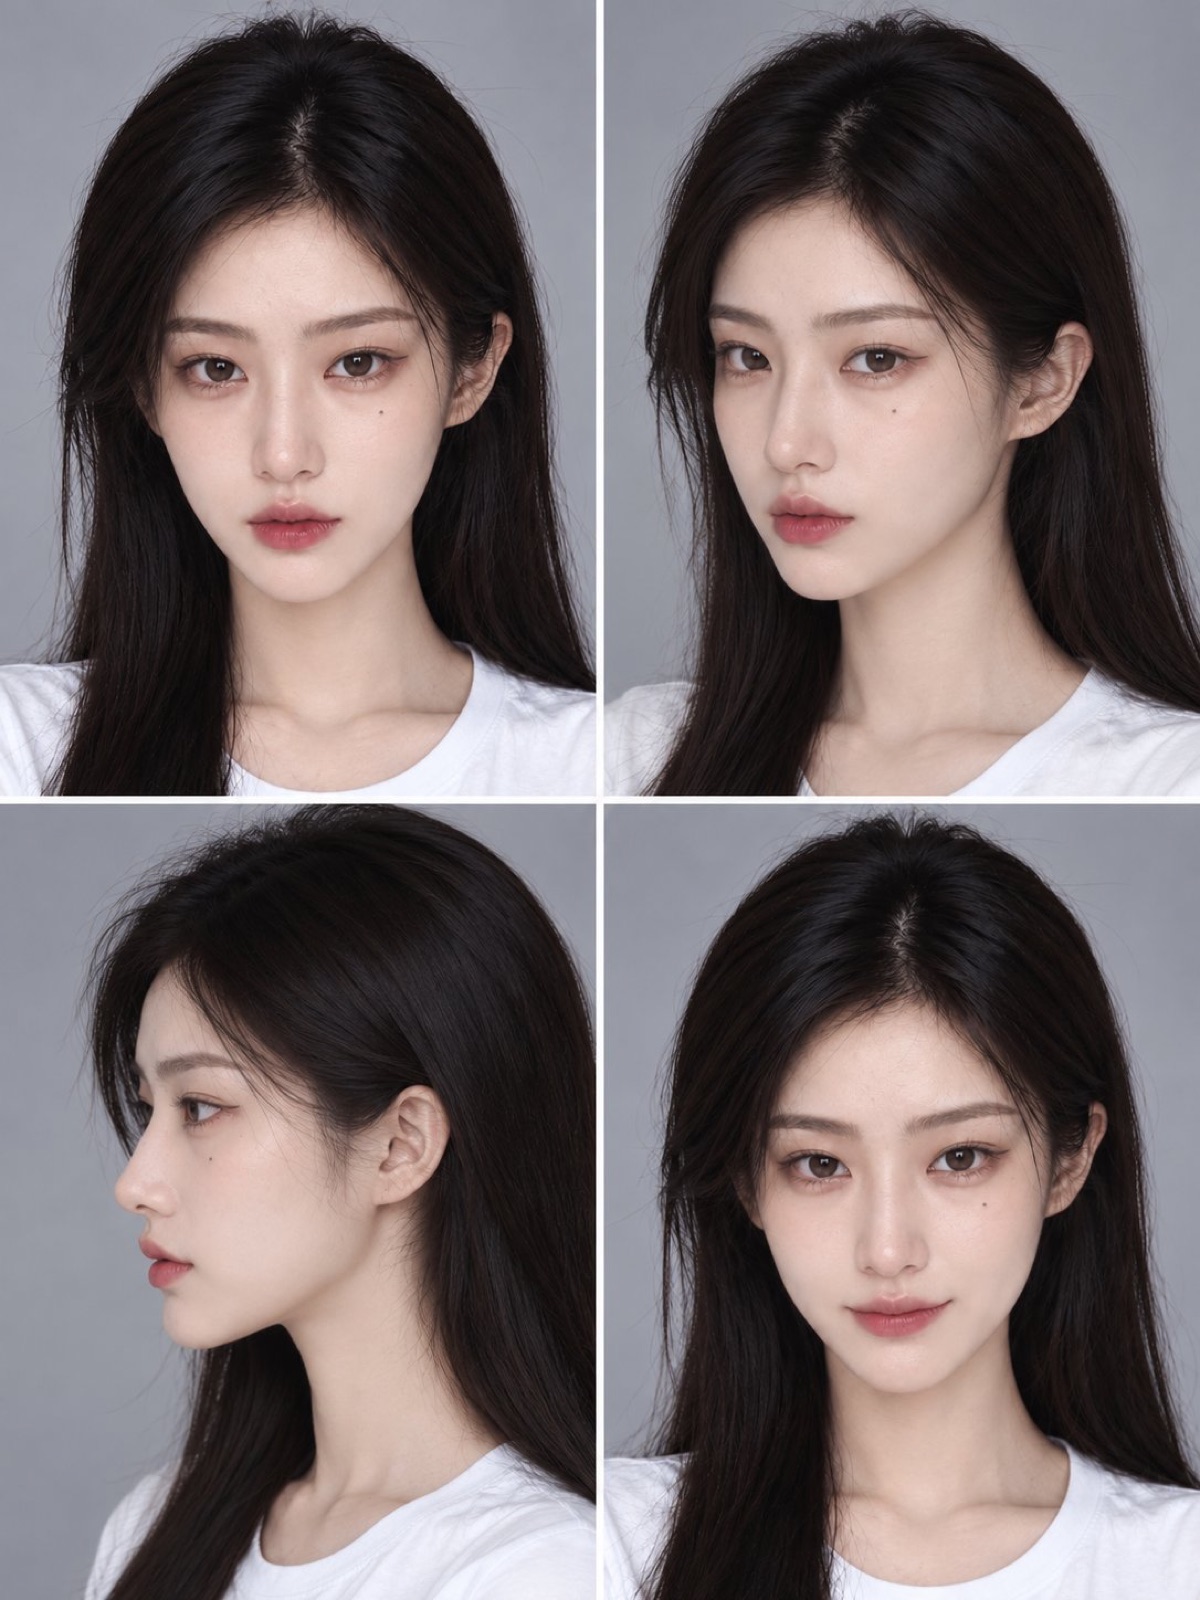
【Prompt, Upload Master Image】Strictly preserve the facial identity, feature proportions, face shape, and under-eye beauty mark of the female subject in the reference image, maintaining the exact same individual throughout; keep hairstyle, white t-shirt, neutral light-grey background, and soft even frontal lighting strictly identical, bust portrait from chest up, realistic photography, ultra-high definition, authentic skin texture preserved, 3:4 aspect ratio. Generate 4 separate individual images, do not create a collage: Image 1: Frontal eye-level view, relaxed neutral expression, lips gently closed; Image 2: Head turned 45 degrees to left, three-quarter profile, eyes looking toward camera front; Image 3: Head turned 90 degrees to left, pure side profile clearly displaying full contour of forehead, nose bridge, lips, and jawline; Image 4: Frontal eye-level view, subtle gentle natural closed-mouth smile
Step 7: Everyday Production Workflow
With the master reference photo saved, generating new scenes is straightforward:
- Upload the master photo via image-to-image.
- Open your prompt with:
Strictly preserve the facial identity, feature proportions, and face shape of the female subject in the reference image, keeping the small light-brown beauty mark beneath the left eye in place, depicting the exact same person throughout; the reference image serves solely to define facial identity and does not pass along its hairstyle, wardrobe, or background. - Describe your desired wardrobe, hairstyle, lighting, and scene in detail.
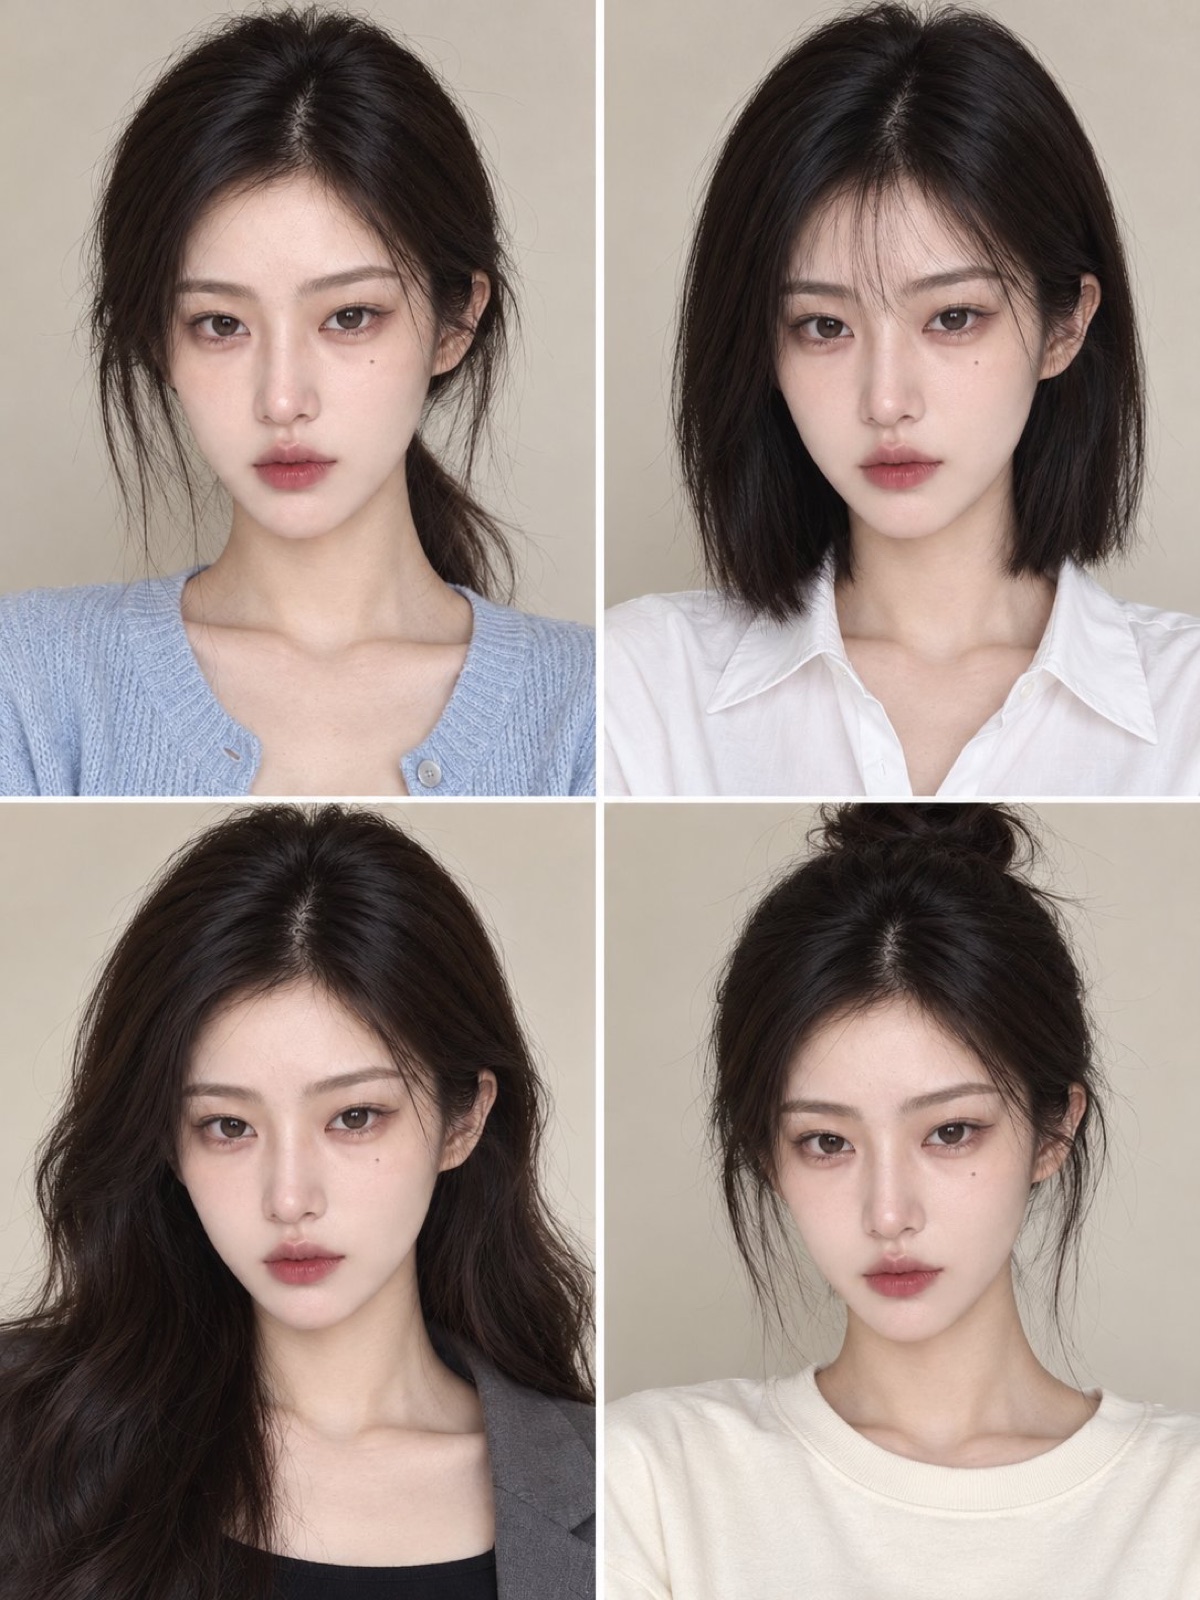
【Prompt, Upload Master Image】Strictly preserve the facial identity, feature proportions, and face shape of the female subject in the reference image, keeping the small light-brown beauty mark beneath the left eye in place, depicting the exact same person throughout; the reference image serves solely to define facial identity and does not pass along its hairstyle, wardrobe, or background. Warm light-beige solid interior wall backdrop, soft diffused indoor daylight, bust portrait from chest up, facing camera, realistic photography, ultra-high definition, 3:4 aspect ratio. Generate 4 individual separate images, character facial identity strictly identical across all 4 frames, do not create a collage: Image 1: Light brown relaxed low ponytail, pale blue knit cardigan; Image 2: Shoulder-length black bob with wispy bangs, crisp white button-down shirt; Image 3: Deep brunette voluminous loose waves, black camisole layered under grey tailored blazer; Image 4: High messy black bun with soft flyaway strands framing ears, cream-white oversized crew-neck sweatshirt
Troubleshooting Facial Inconsistency
If a generation doesn’t resemble your character, run through these checks:
- Too many blur descriptors: Heavy low-res, vintage CCD, motion blur, and light bloom erase facial micro-features. Limit yourself to 2–3 texture keywords, and add
facial features remain relatively sharp. - Face is obstructed: Thick bangs covering the eyes, hands over the cheeks, or extreme wide shots give the model too little visual reference. On wide shots, append the textual character card into the prompt alongside the reference image.
- Heavy makeup: Heavy eyeliner or overdrawn lips alter underlying eye and lip geometry. Stick to natural makeup.
- Beauty mark drifted: Reiterate its exact location in the prompt.
- Flawed master photo: If outputs consistently look off across diverse prompts, the master reference likely has hidden issues (uneven lighting, tilted angle, subtle smirk). Return to Step 4 and generate a cleaner baseline.
Final Advice
- Build an original face from scratch. Never prompt “looks like [celebrity]” and never use real people’s photos as reference anchors. An original character is 100% yours to brand, develop, and commercialize.
- Organize your character assets. Keep the character card text, master photo, and angle sheets in a dedicated folder.
- Keep facial geometry locked. Change her clothes, hair color, makeup, and locations freely, but keep the underlying bone structure fixed.
Which eye shape will you choose for your character? Let me know in the comments!